You’ve got early access. The app is open. There’s a settings screen in front of you and a vague sense that you’re supposed to do something.
This is that walkthrough.
We’ll go through every step — from first launch to a fully enriched, organized, ready-to-play library — and explain what’s actually happening at each stage and why it works the way it does.
Step 1: Settings First, Library Second
Before Kombiner touches a single file, it needs to know two things: where your music lives, and how you want it organized going forward.
Open Settings → Library and you’ll see three things worth your attention:
- Library location — the root folder where Kombiner will manage your files. Point this at wherever your music actually lives, not wherever you wish it lived.
- File path template — this is how every file in your library will be named and organized. You define the pattern once. Kombiner applies it consistently, forever.
- Audio conversion settings — your preferred output format and bitrate. If you want everything normalized to AIFF at 320kbps, set it here. Kombiner will handle the rest.
There’s also a Display section for UI preferences, and a License tab where your activation key lives.
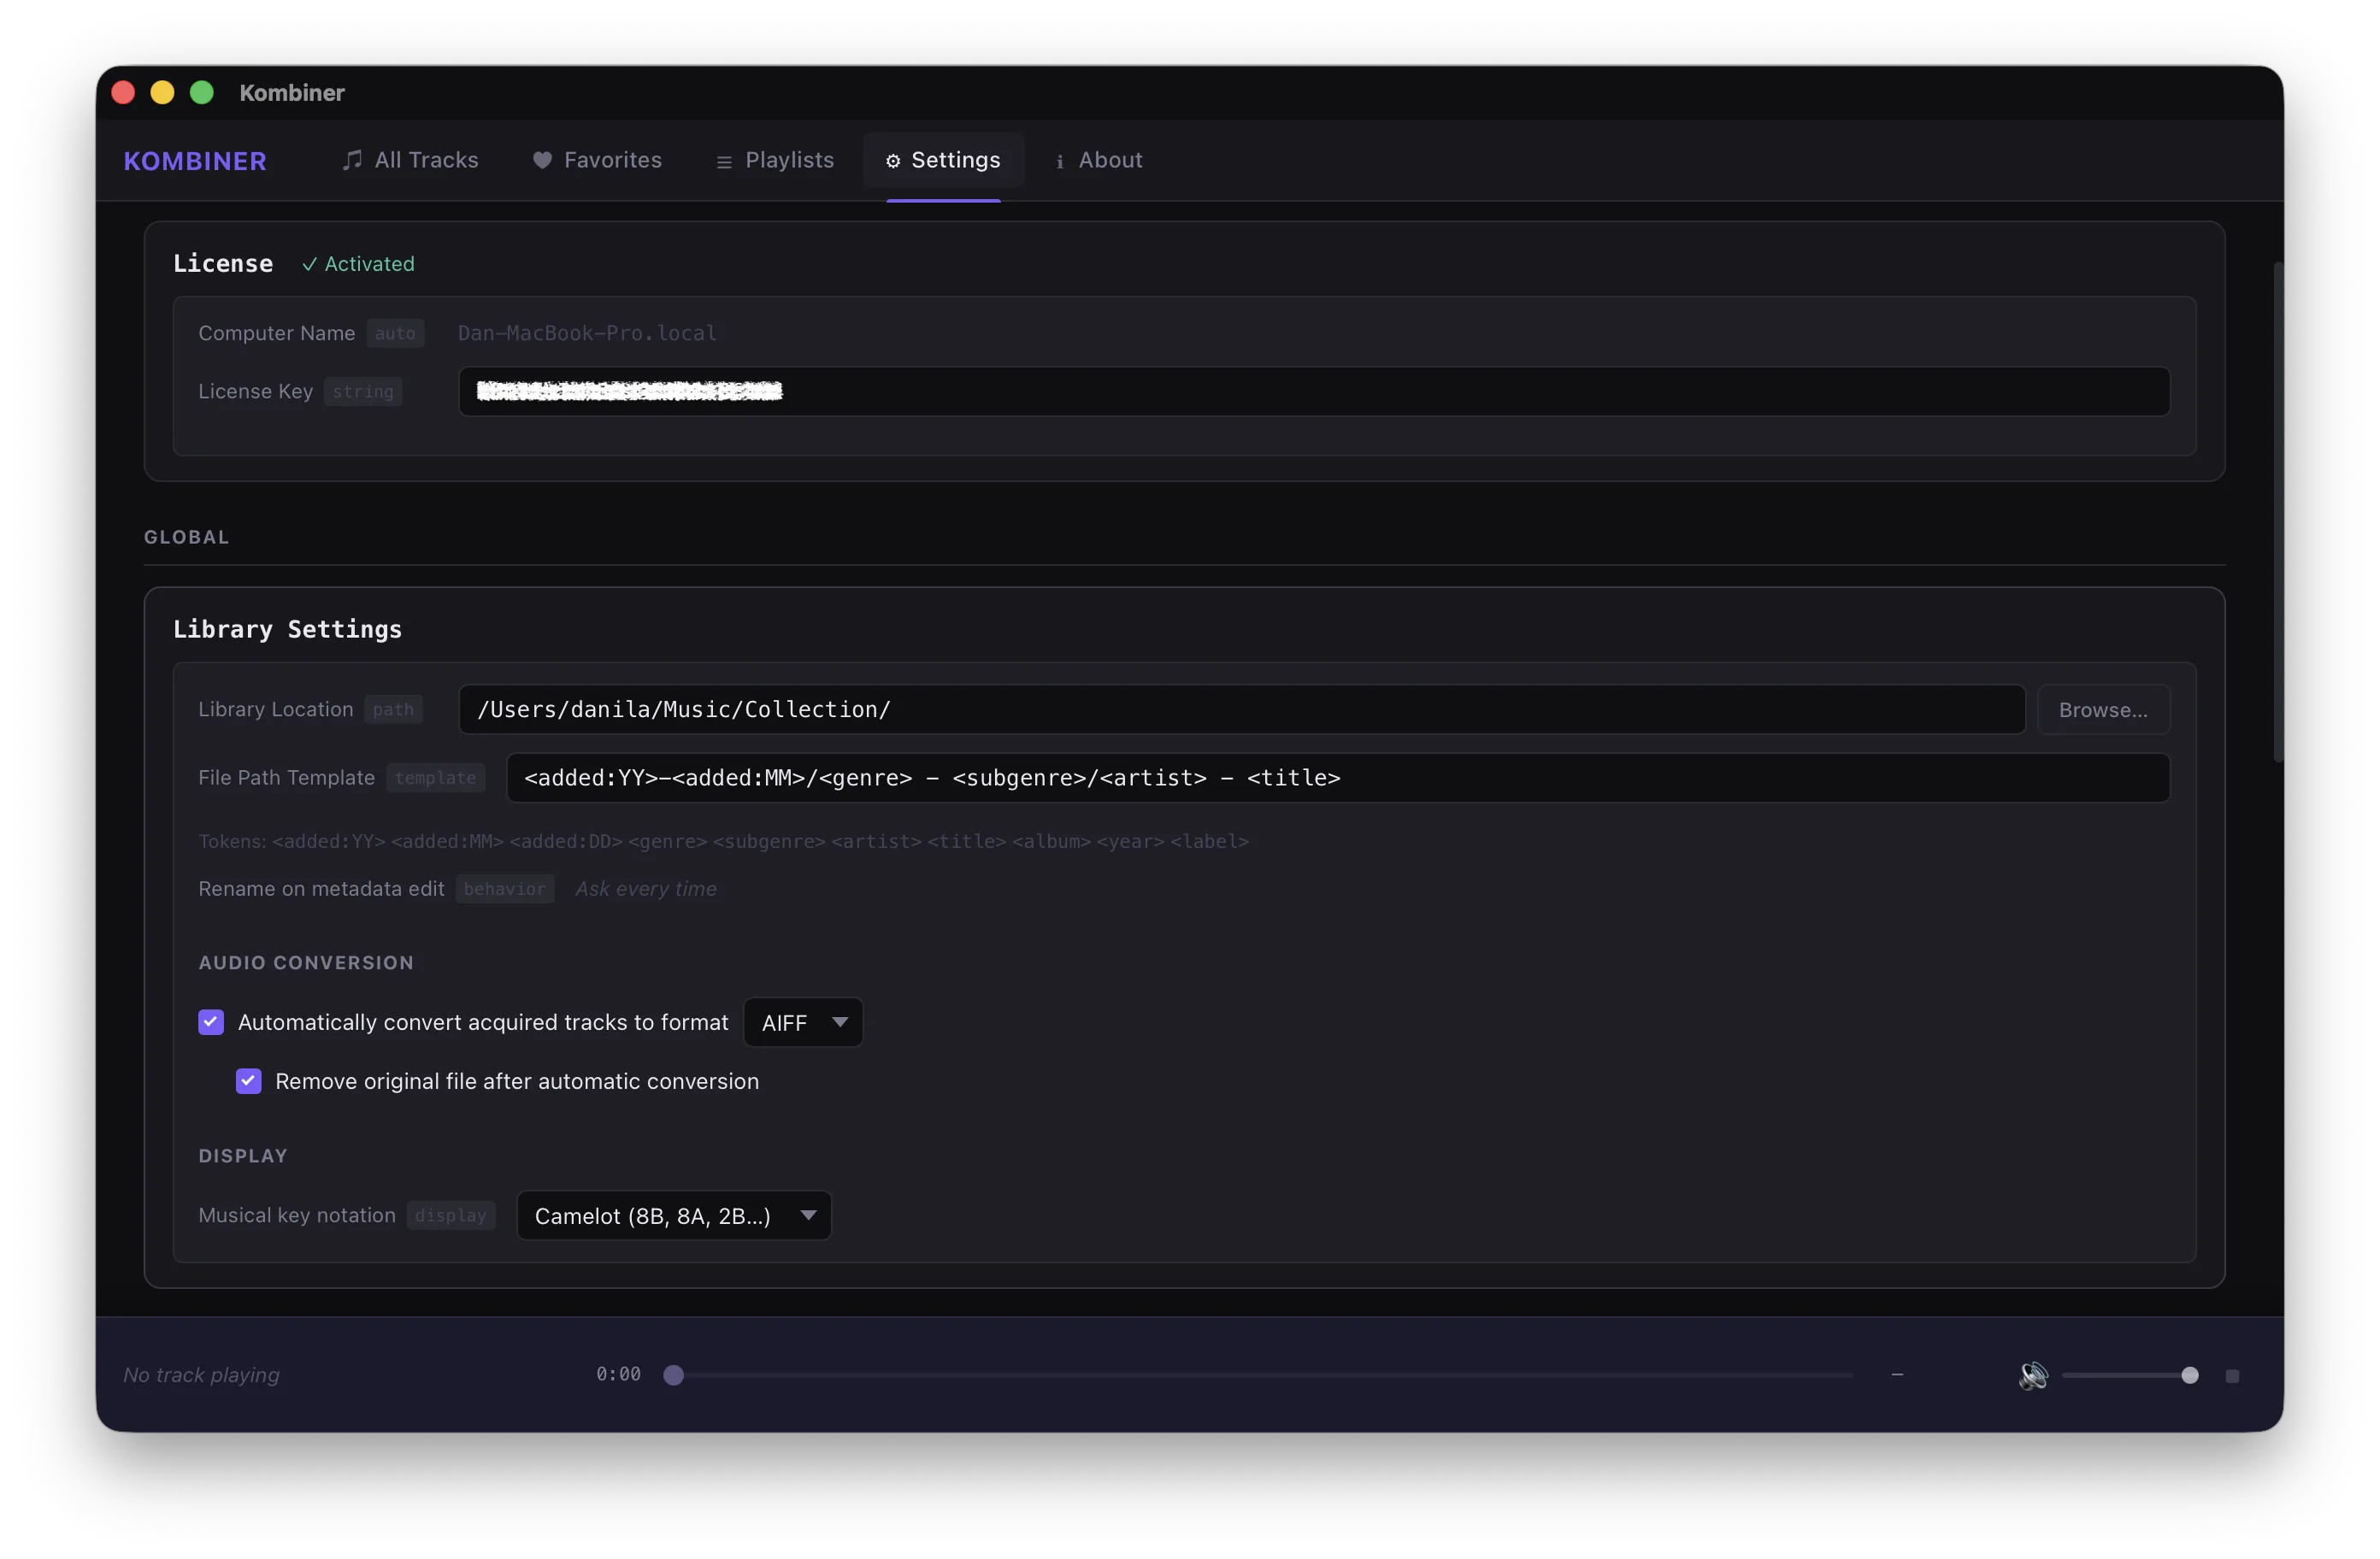
The file path template deserves a moment. This is the thing that replaces the artist_name_-_track_title_(original_mix)_beatport.mp3 chaos. You write something like {artist}/{year}/{artist} - {title} and every track — regardless of where it came from — ends up named and filed the same way. No exceptions. No “just this once.”
Set this up before you import anything. It’s much easier to define structure before the files arrive than to rename 4,000 tracks after the fact.
Step 2: Install Your Plugins
Kombiner’s enrichment pipeline runs on plugins. After initial setup, head to the Plugin Catalog and install the ones you need.
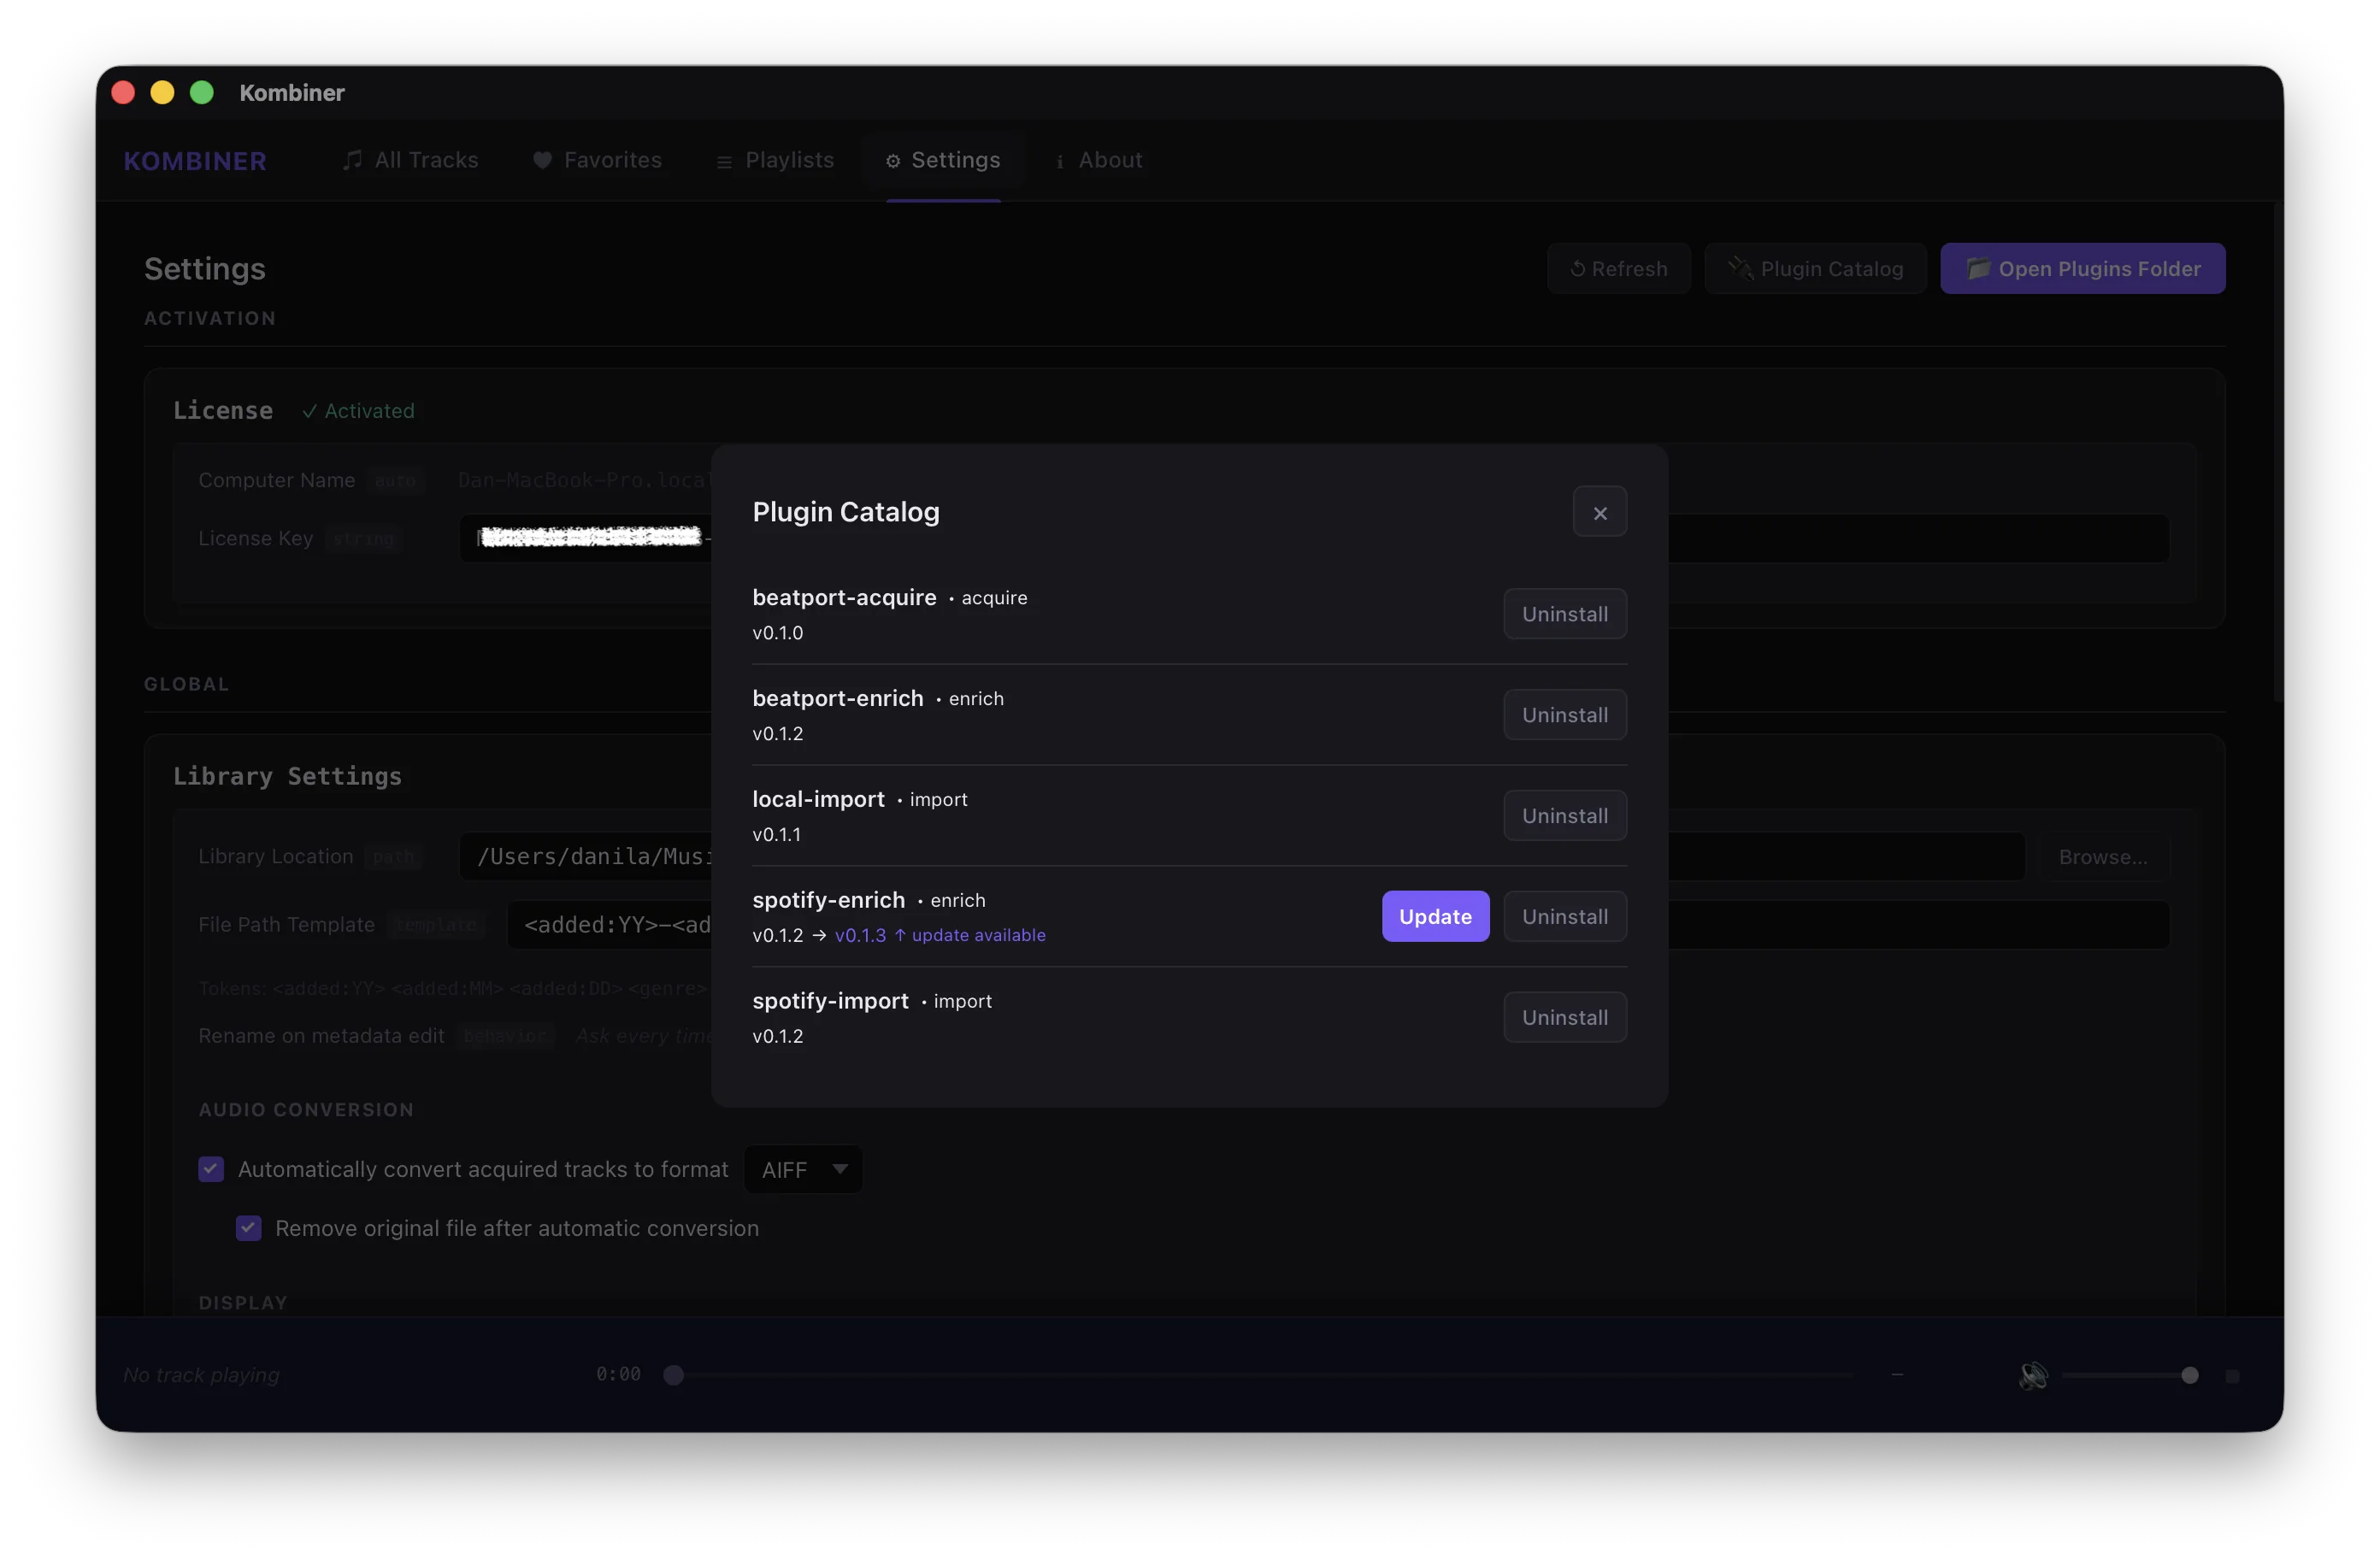
Plugins are the workers in the pipeline — currently there are 3 types:
- Import - load your library from the disk or services like Spotify
- Enrich - get metadata from sources like Beatport and Spotify
- Acquire - download from collection or buy on Beatport without leaving the app
Install the plugins relevant to your workflow. You don’t have to install everything — if you don’t care about automatic genre tagging, skip that plugin. The pipeline only runs what you’ve installed.
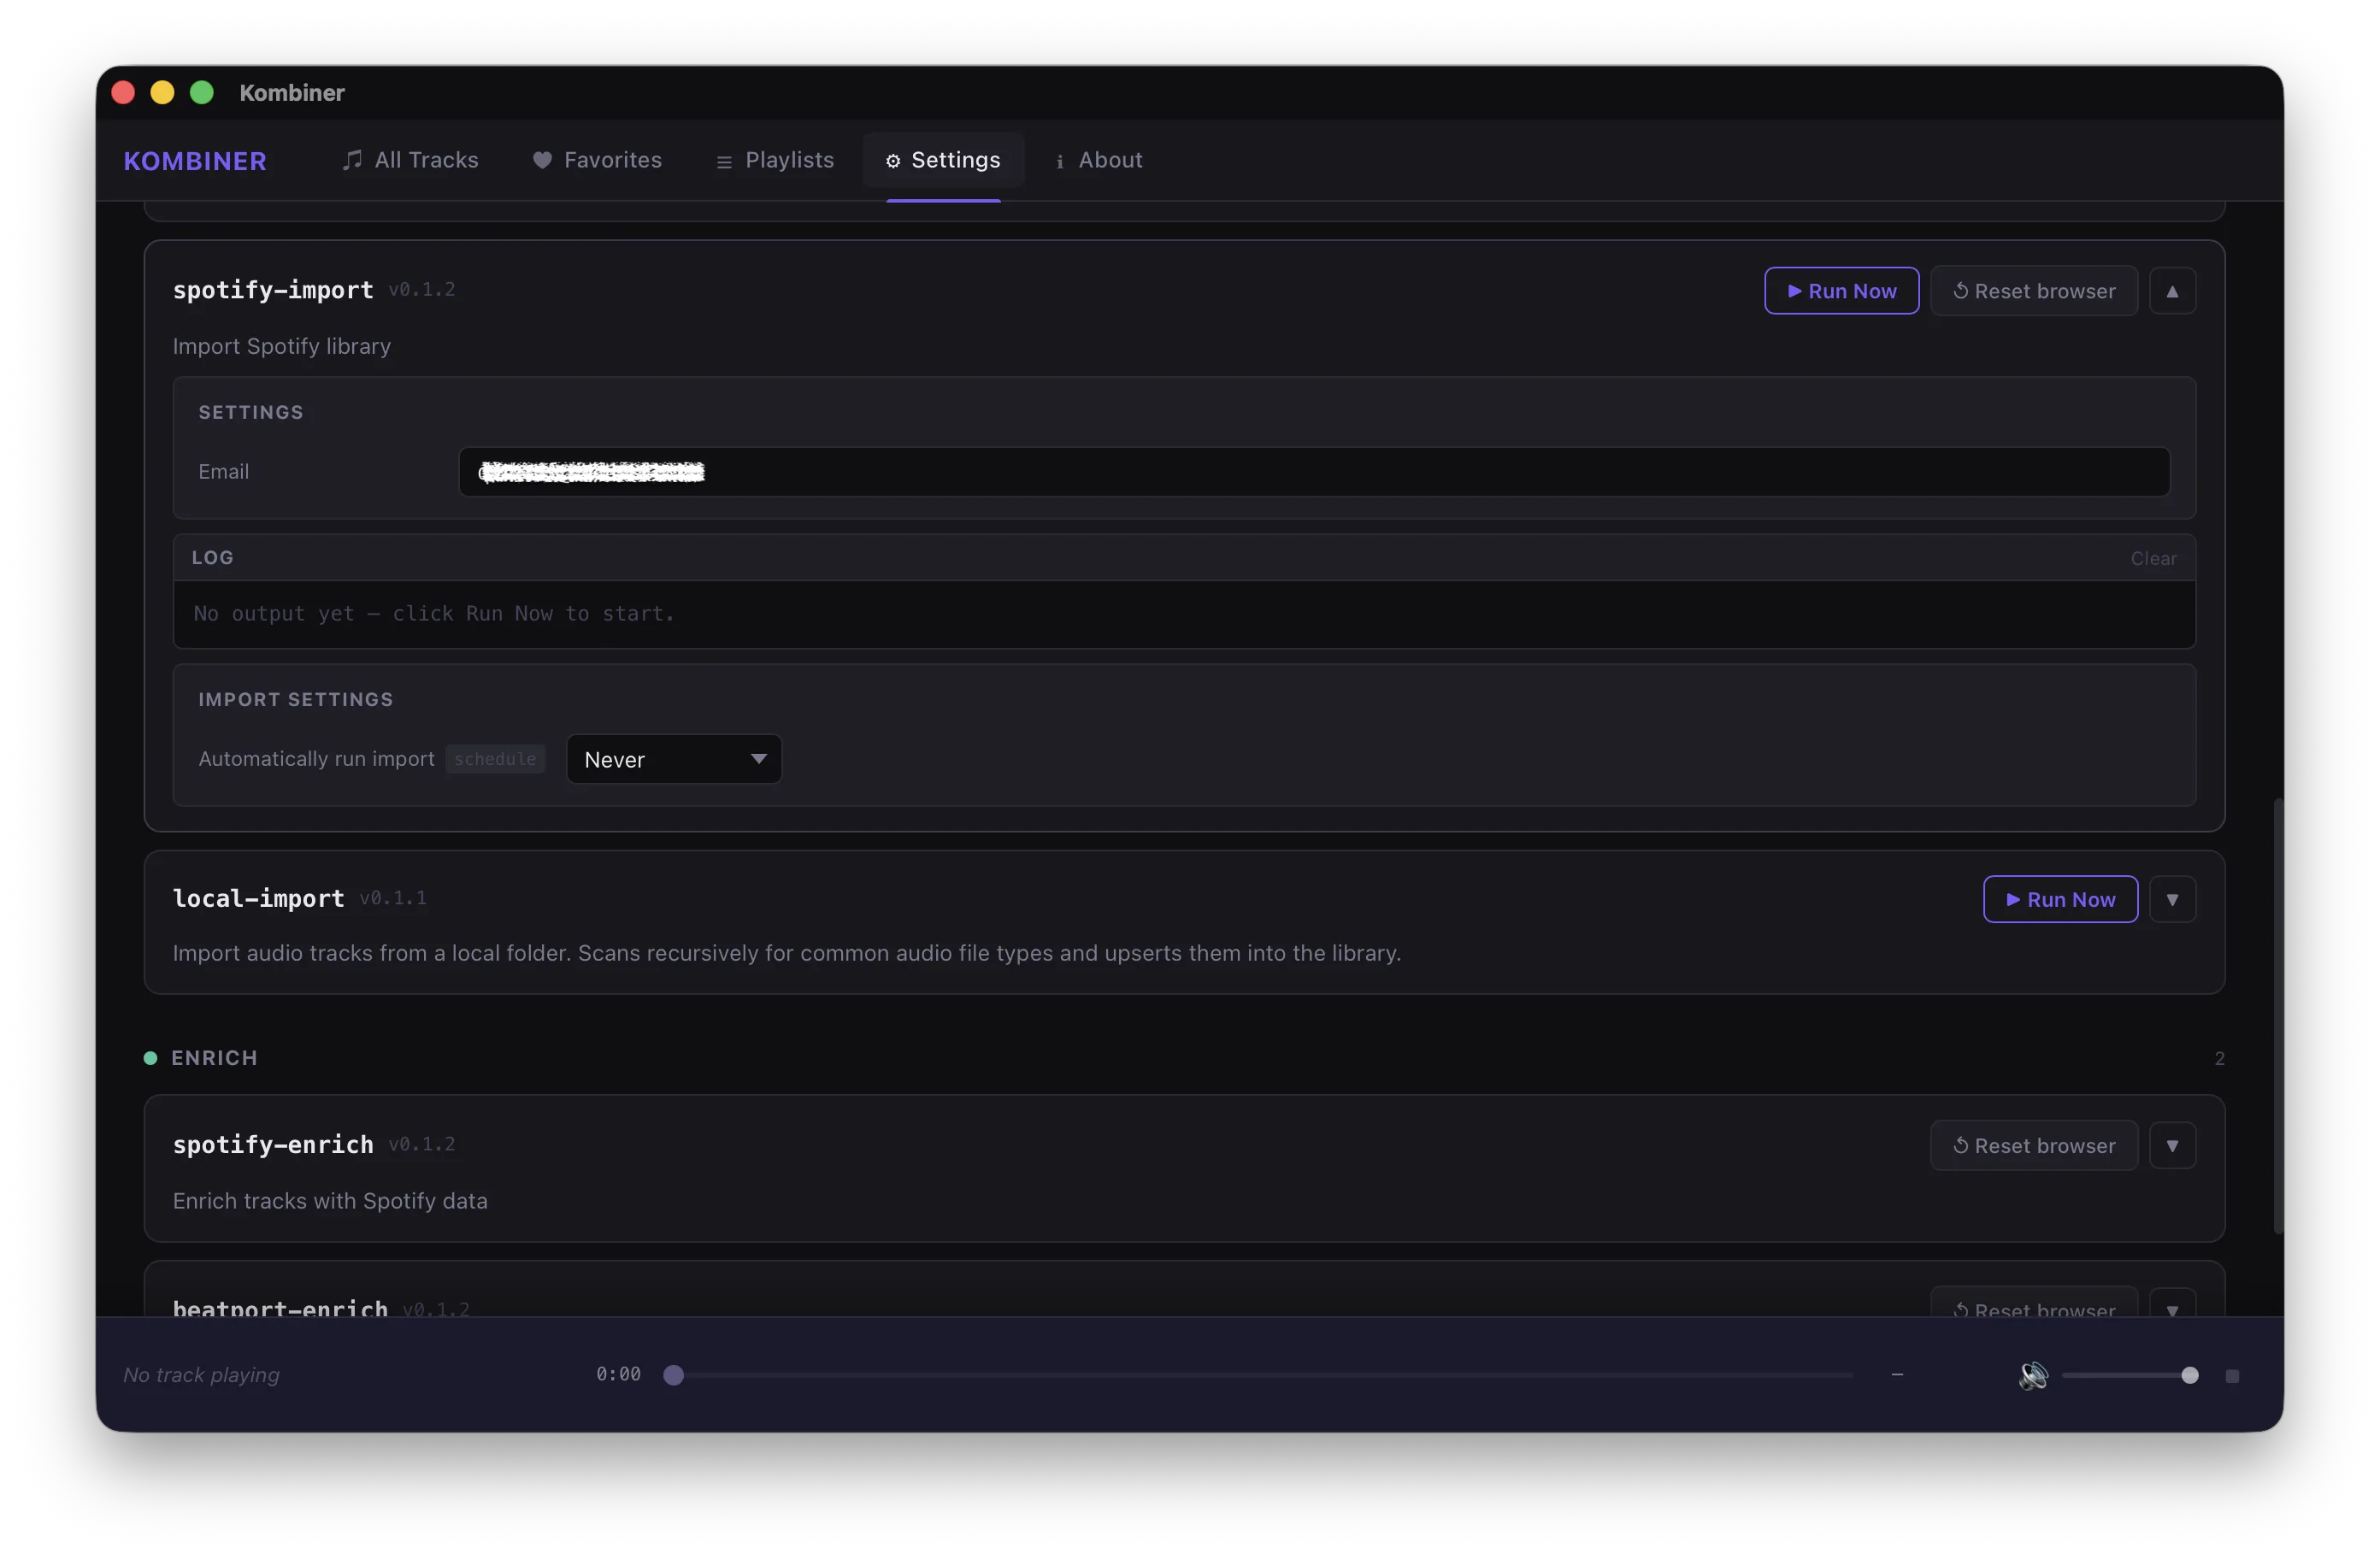
After installation, each plugin has its own Settings panel. This is where you’ll find:
- Auth credentials — API keys, login details, whatever the plugin needs to do its job. Passwords are stored securely in Keychain Access on macOS and Credentials Manager on Windows. They’re not sitting in a plaintext config file.
- Logs — a per-plugin activity log so you can see exactly what ran, when, and what it returned. If something looks wrong, the log is where you start.
- Automatic run settings — configure whether a plugin runs automatically on import, on demand, or on a schedule. You can set BPM detection to run on every new track and leave genre classification as a manual step, for example. Your call.
Once your plugins are configured, the pipeline is live. Everything from here on is largely automatic.
Step 3: Your Library, Actually Organized
The All Tracks table is the main view — every file in your library, one row per track.
This isn’t just a file list. Each row surfaces the metadata that matters: BPM, key, bitrate, duration, genre, subgenre, file path, source. The columns you care about are visible; the ones you don’t can stay hidden.
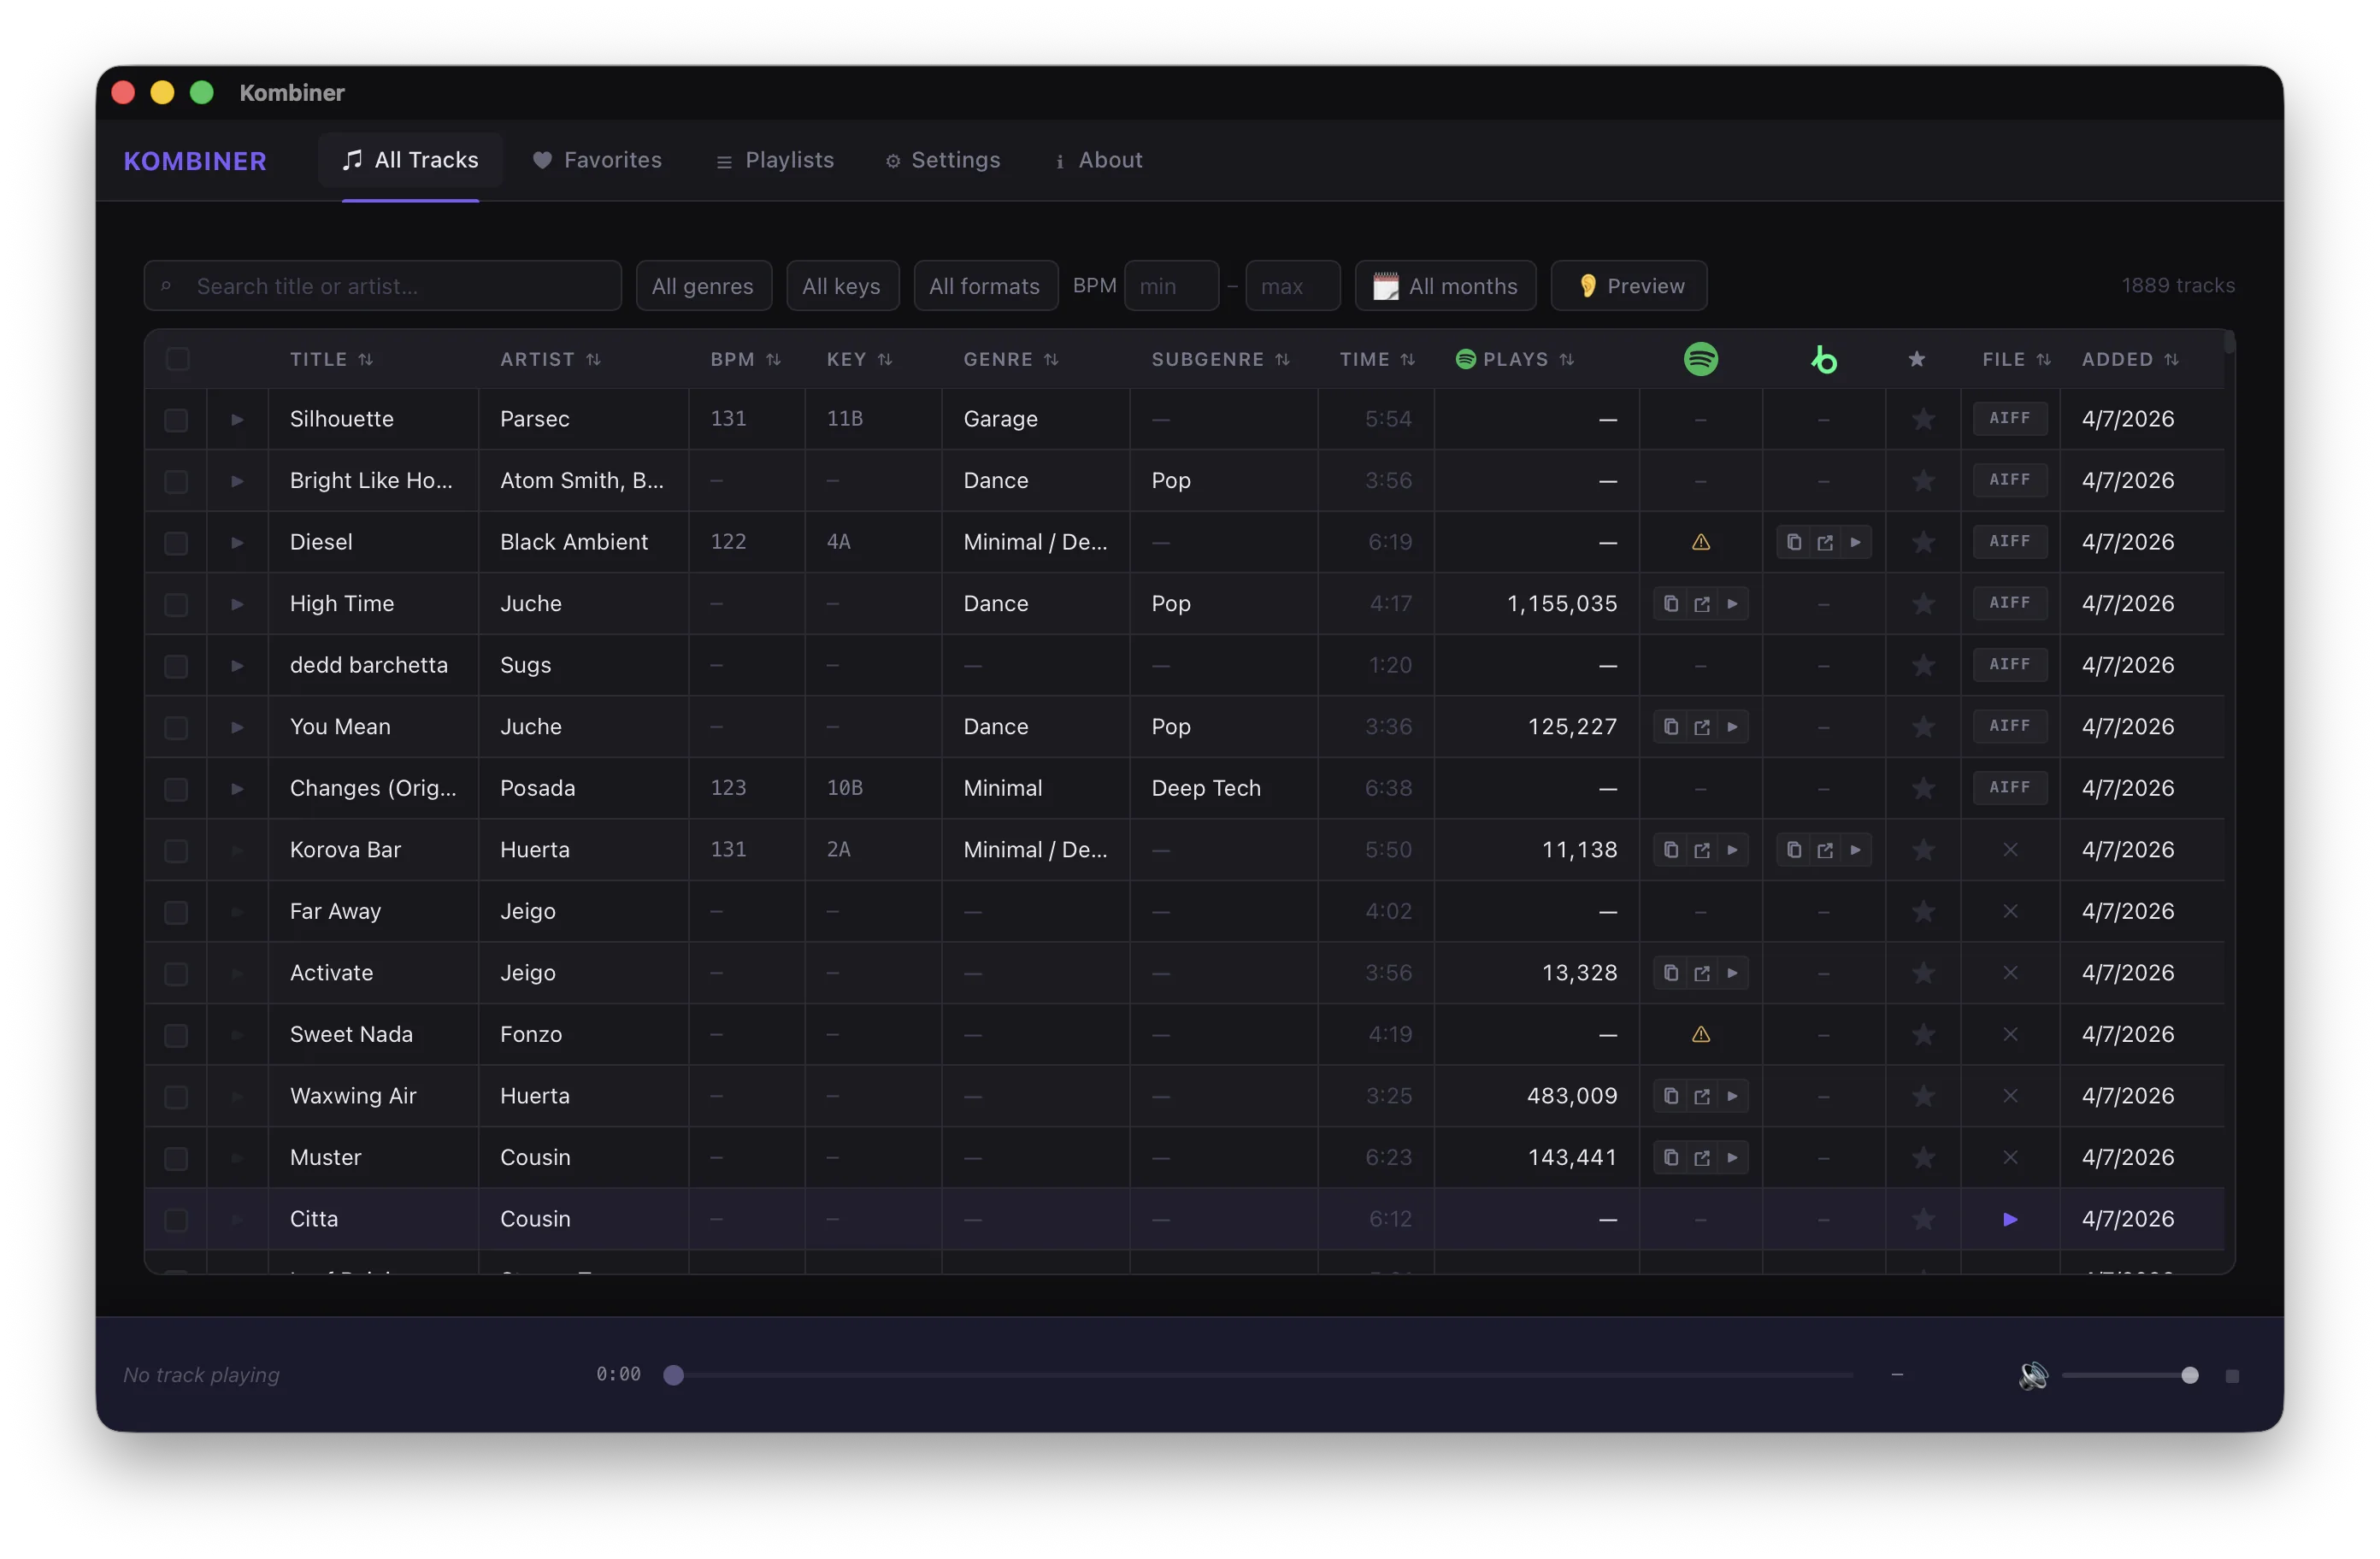
From this view you can:
- Play a track directly in the app — useful for quick confirmation before a set
- Edit metadata inline — click a field, change it, done
- Run plugins on a single track — right-click and trigger any installed plugin on just that file, without touching the rest of your library
- Access file actions via the file menu — open in Finder, reveal path, copy metadata
The table is also where you’ll first notice the yellow dot.
The Yellow Dot
If a row has a yellow dot, it means two or more plugins returned different values for the same field — usually BPM.
This is actually useful information. One plugin says 128. Another says 64. That’s not a bug — that’s the system telling you there’s ambiguity worth resolving, rather than silently picking one and hoping for the best.
Click the yellow dot (or open the action menu for that track) and you’ll see the competing values. Pick the one you trust. It becomes the canonical value for that track. The dot goes away.
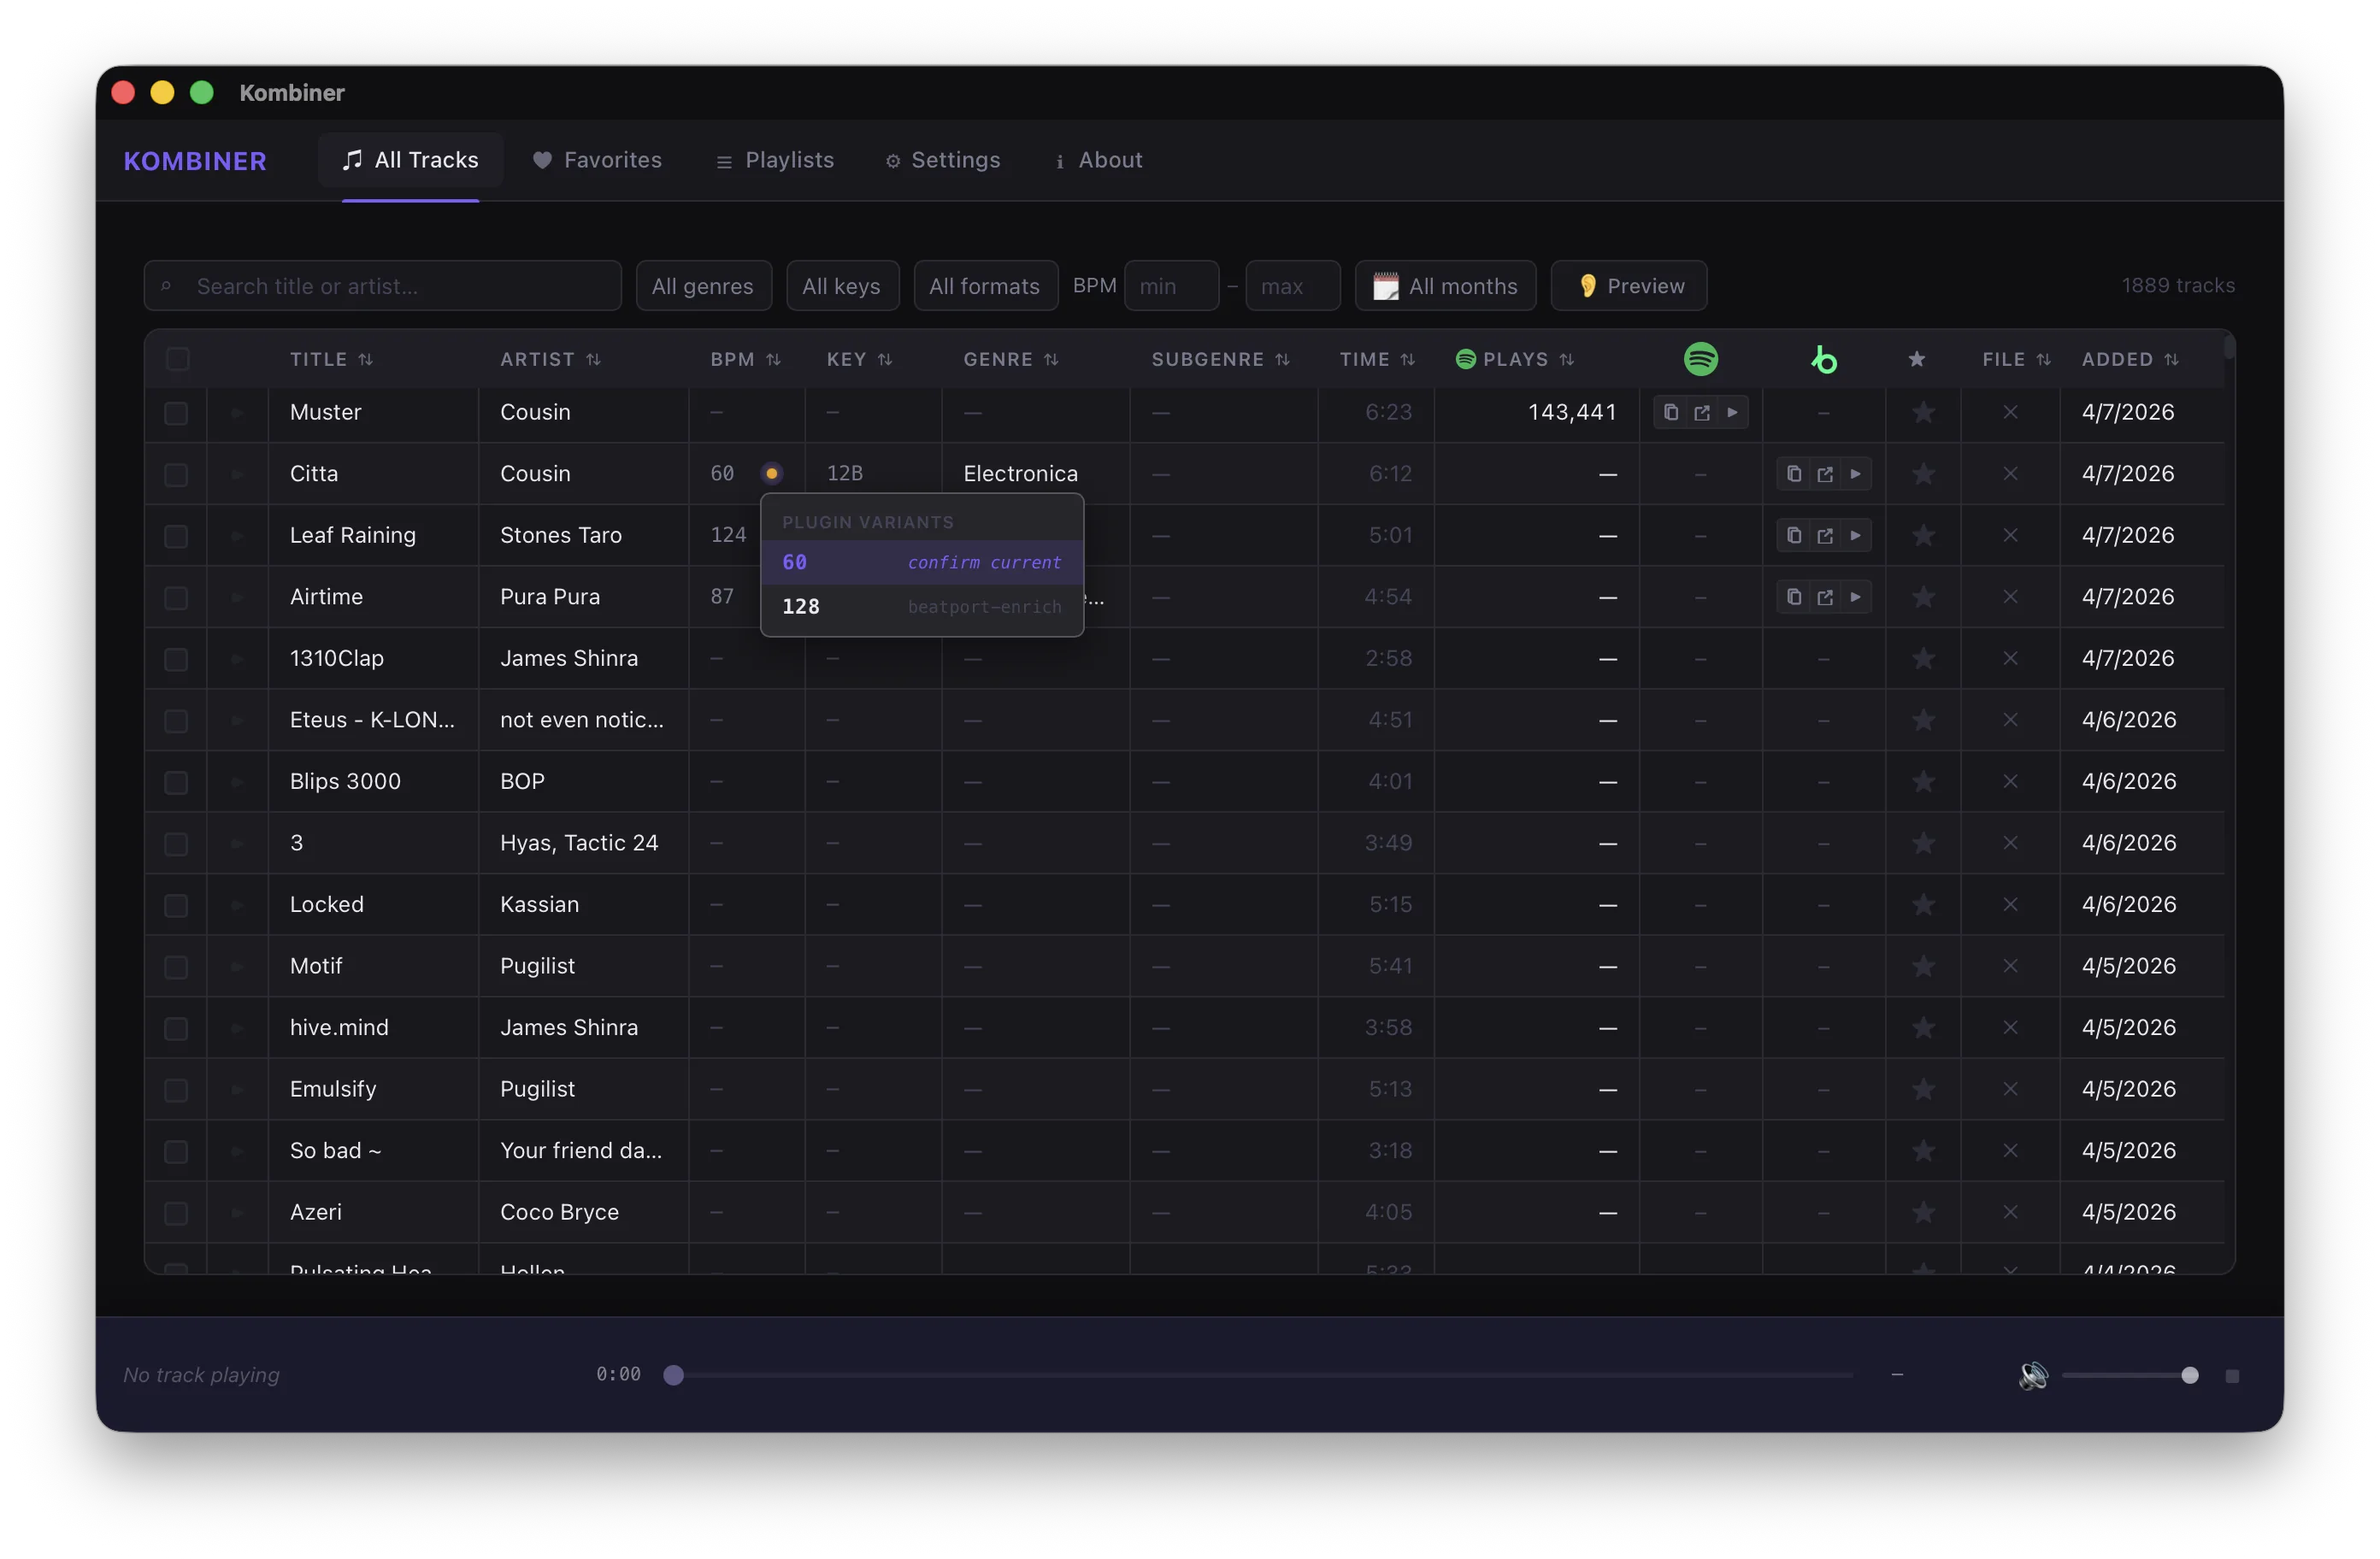
This is the difference between a library you trust and one you’re always second-guessing.
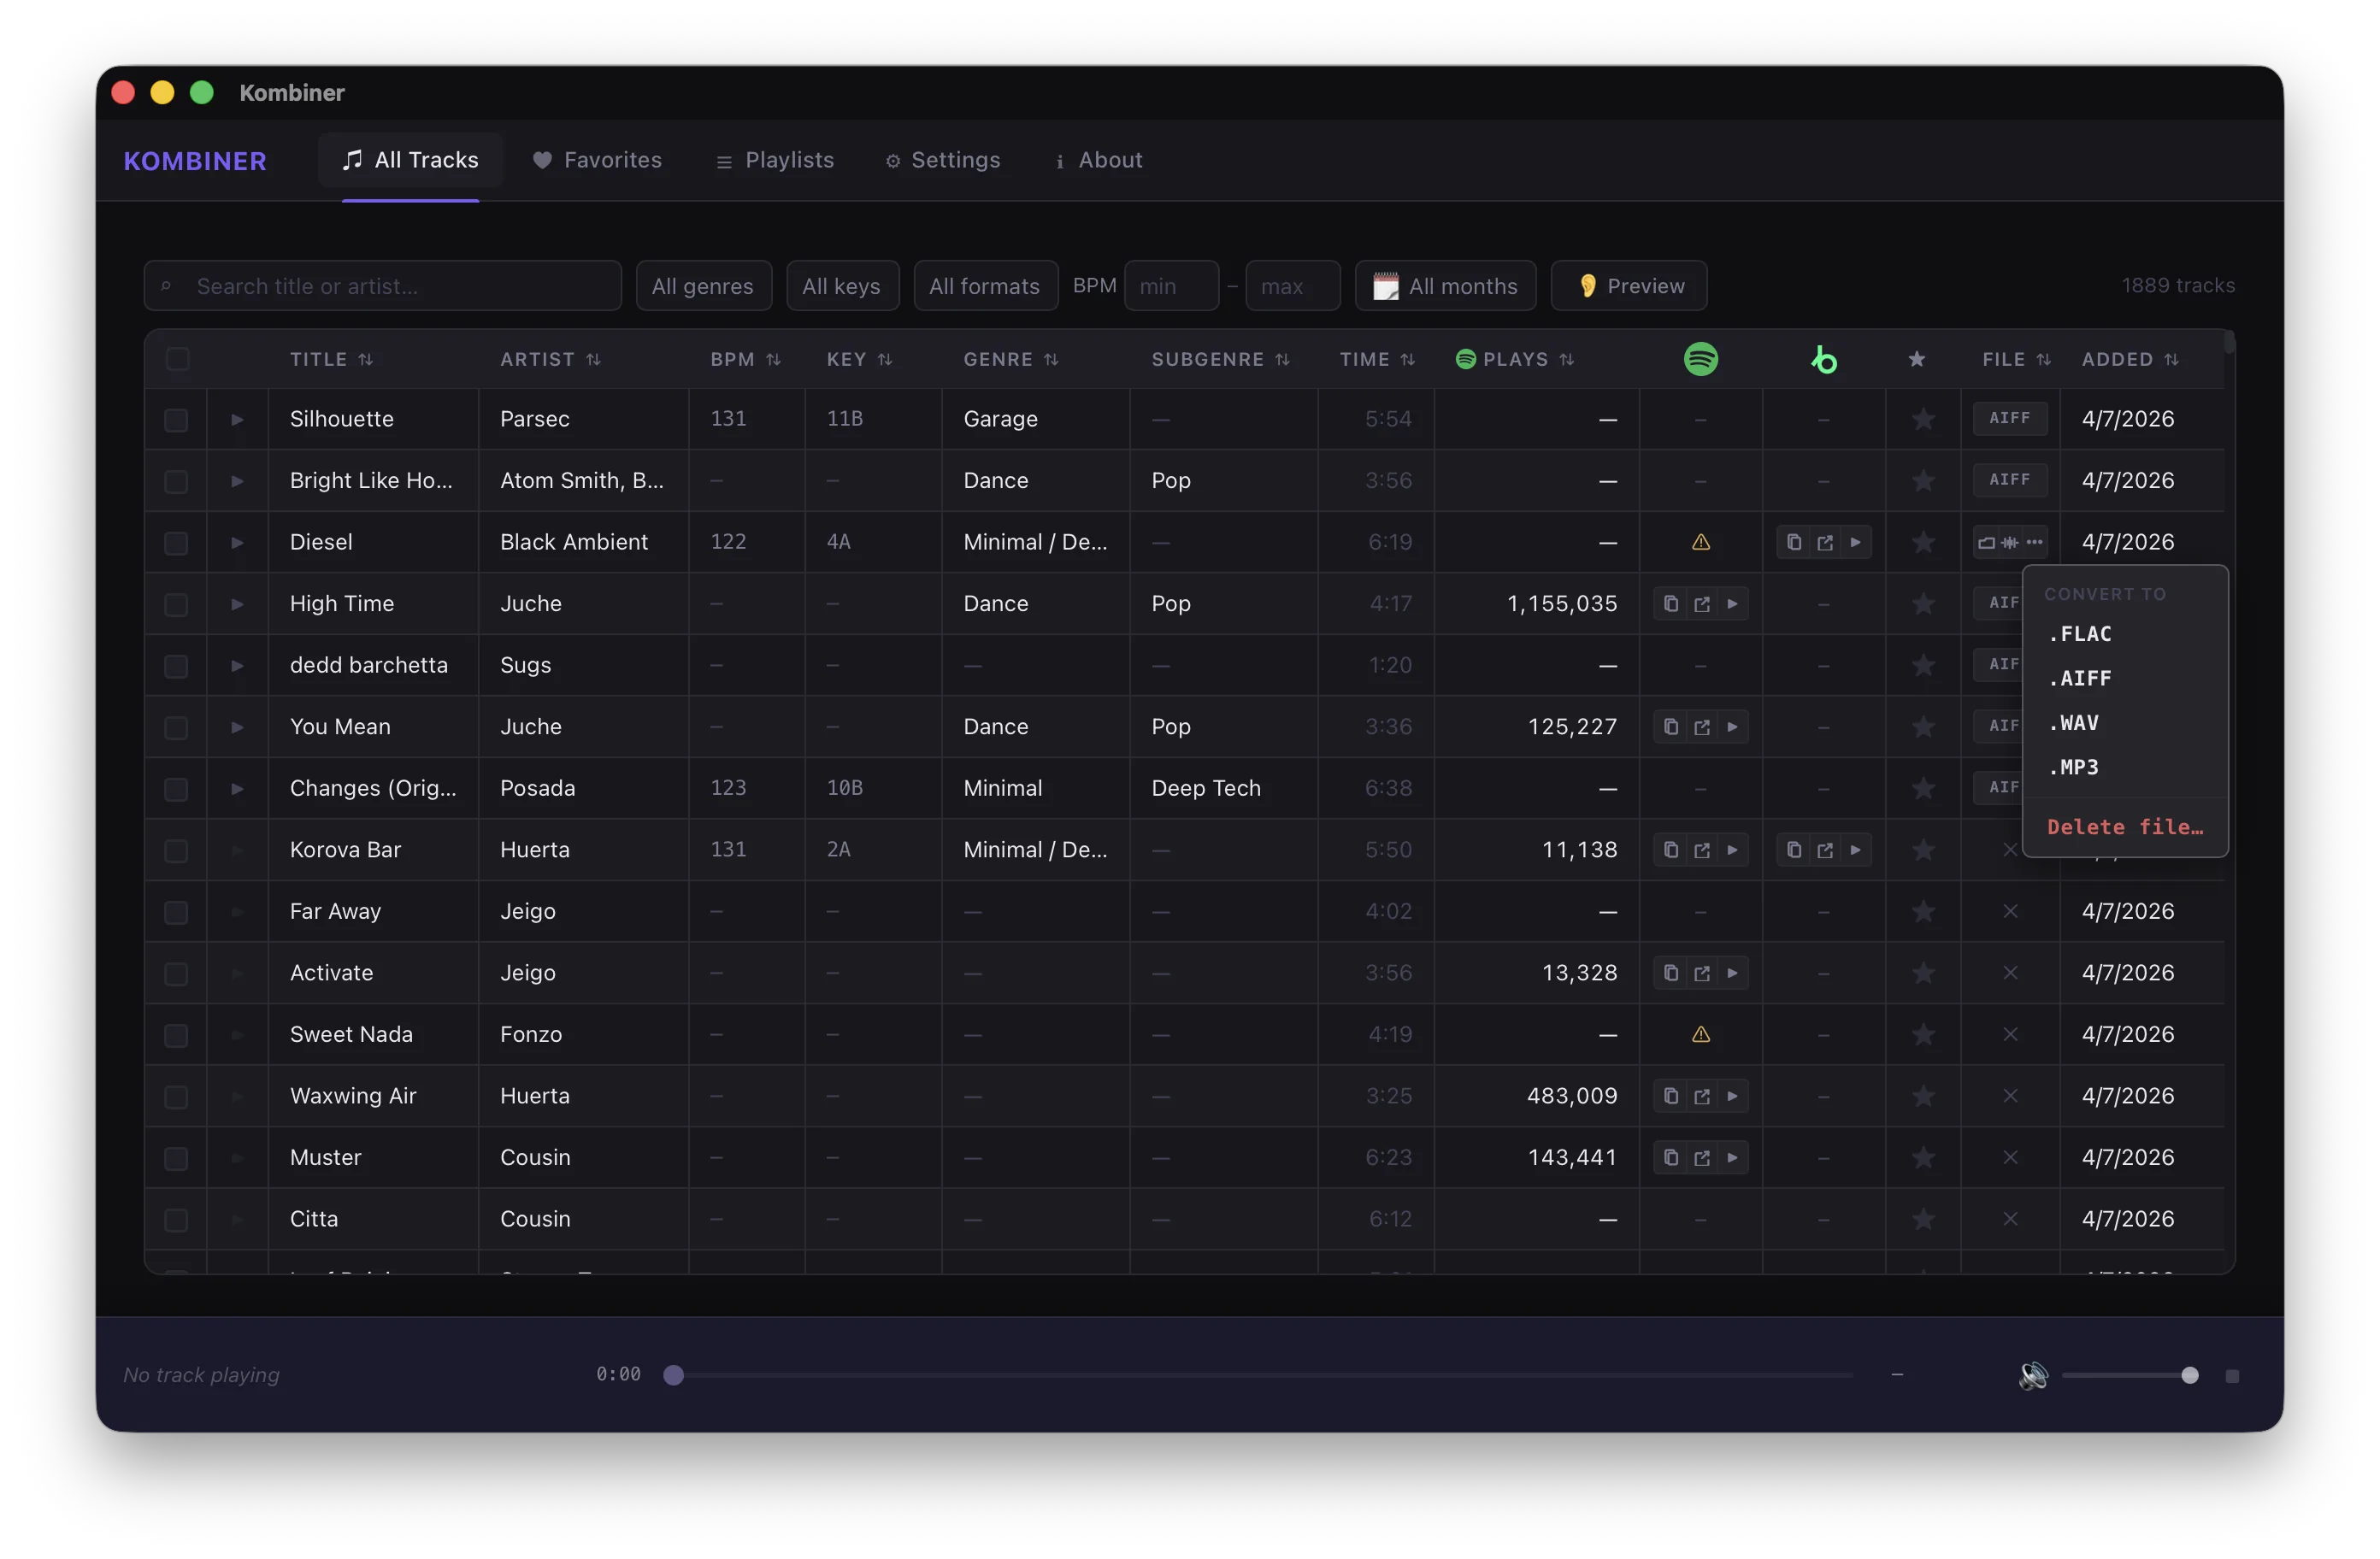
Step 4: Track Actions and Batch Operations
For individual tracks, the Track menu gives you two key actions beyond the standard metadata editing:
- Conversion — transcode the file to your preferred format, using the settings you defined in Step 1
- Delete file — removes the file from disk. This is distinct from removing a track from the library. If you just want to unlist a track without deleting it, use the library removal option in the main menu. If you want it gone from your drive, use Delete file here.
That distinction matters. Accidentally deleting files from disk is a bad day. Kombiner keeps the two actions separate on purpose.
For working at scale, Batch Actions let you apply operations across a selection of tracks simultaneously:
- Genre / subgenre change — reclassify a whole selection at once. Useful after a bulk import where the source metadata is wrong or missing.
- Run plugins — trigger any installed plugin across the entire selection. Reanalyze 200 tracks for BPM in one action.
- Conversion — transcode a batch to your target format.
- Delete — remove selected tracks from the library. Again: this removes from library, not from disk. The per-track Delete file action is the disk operation.
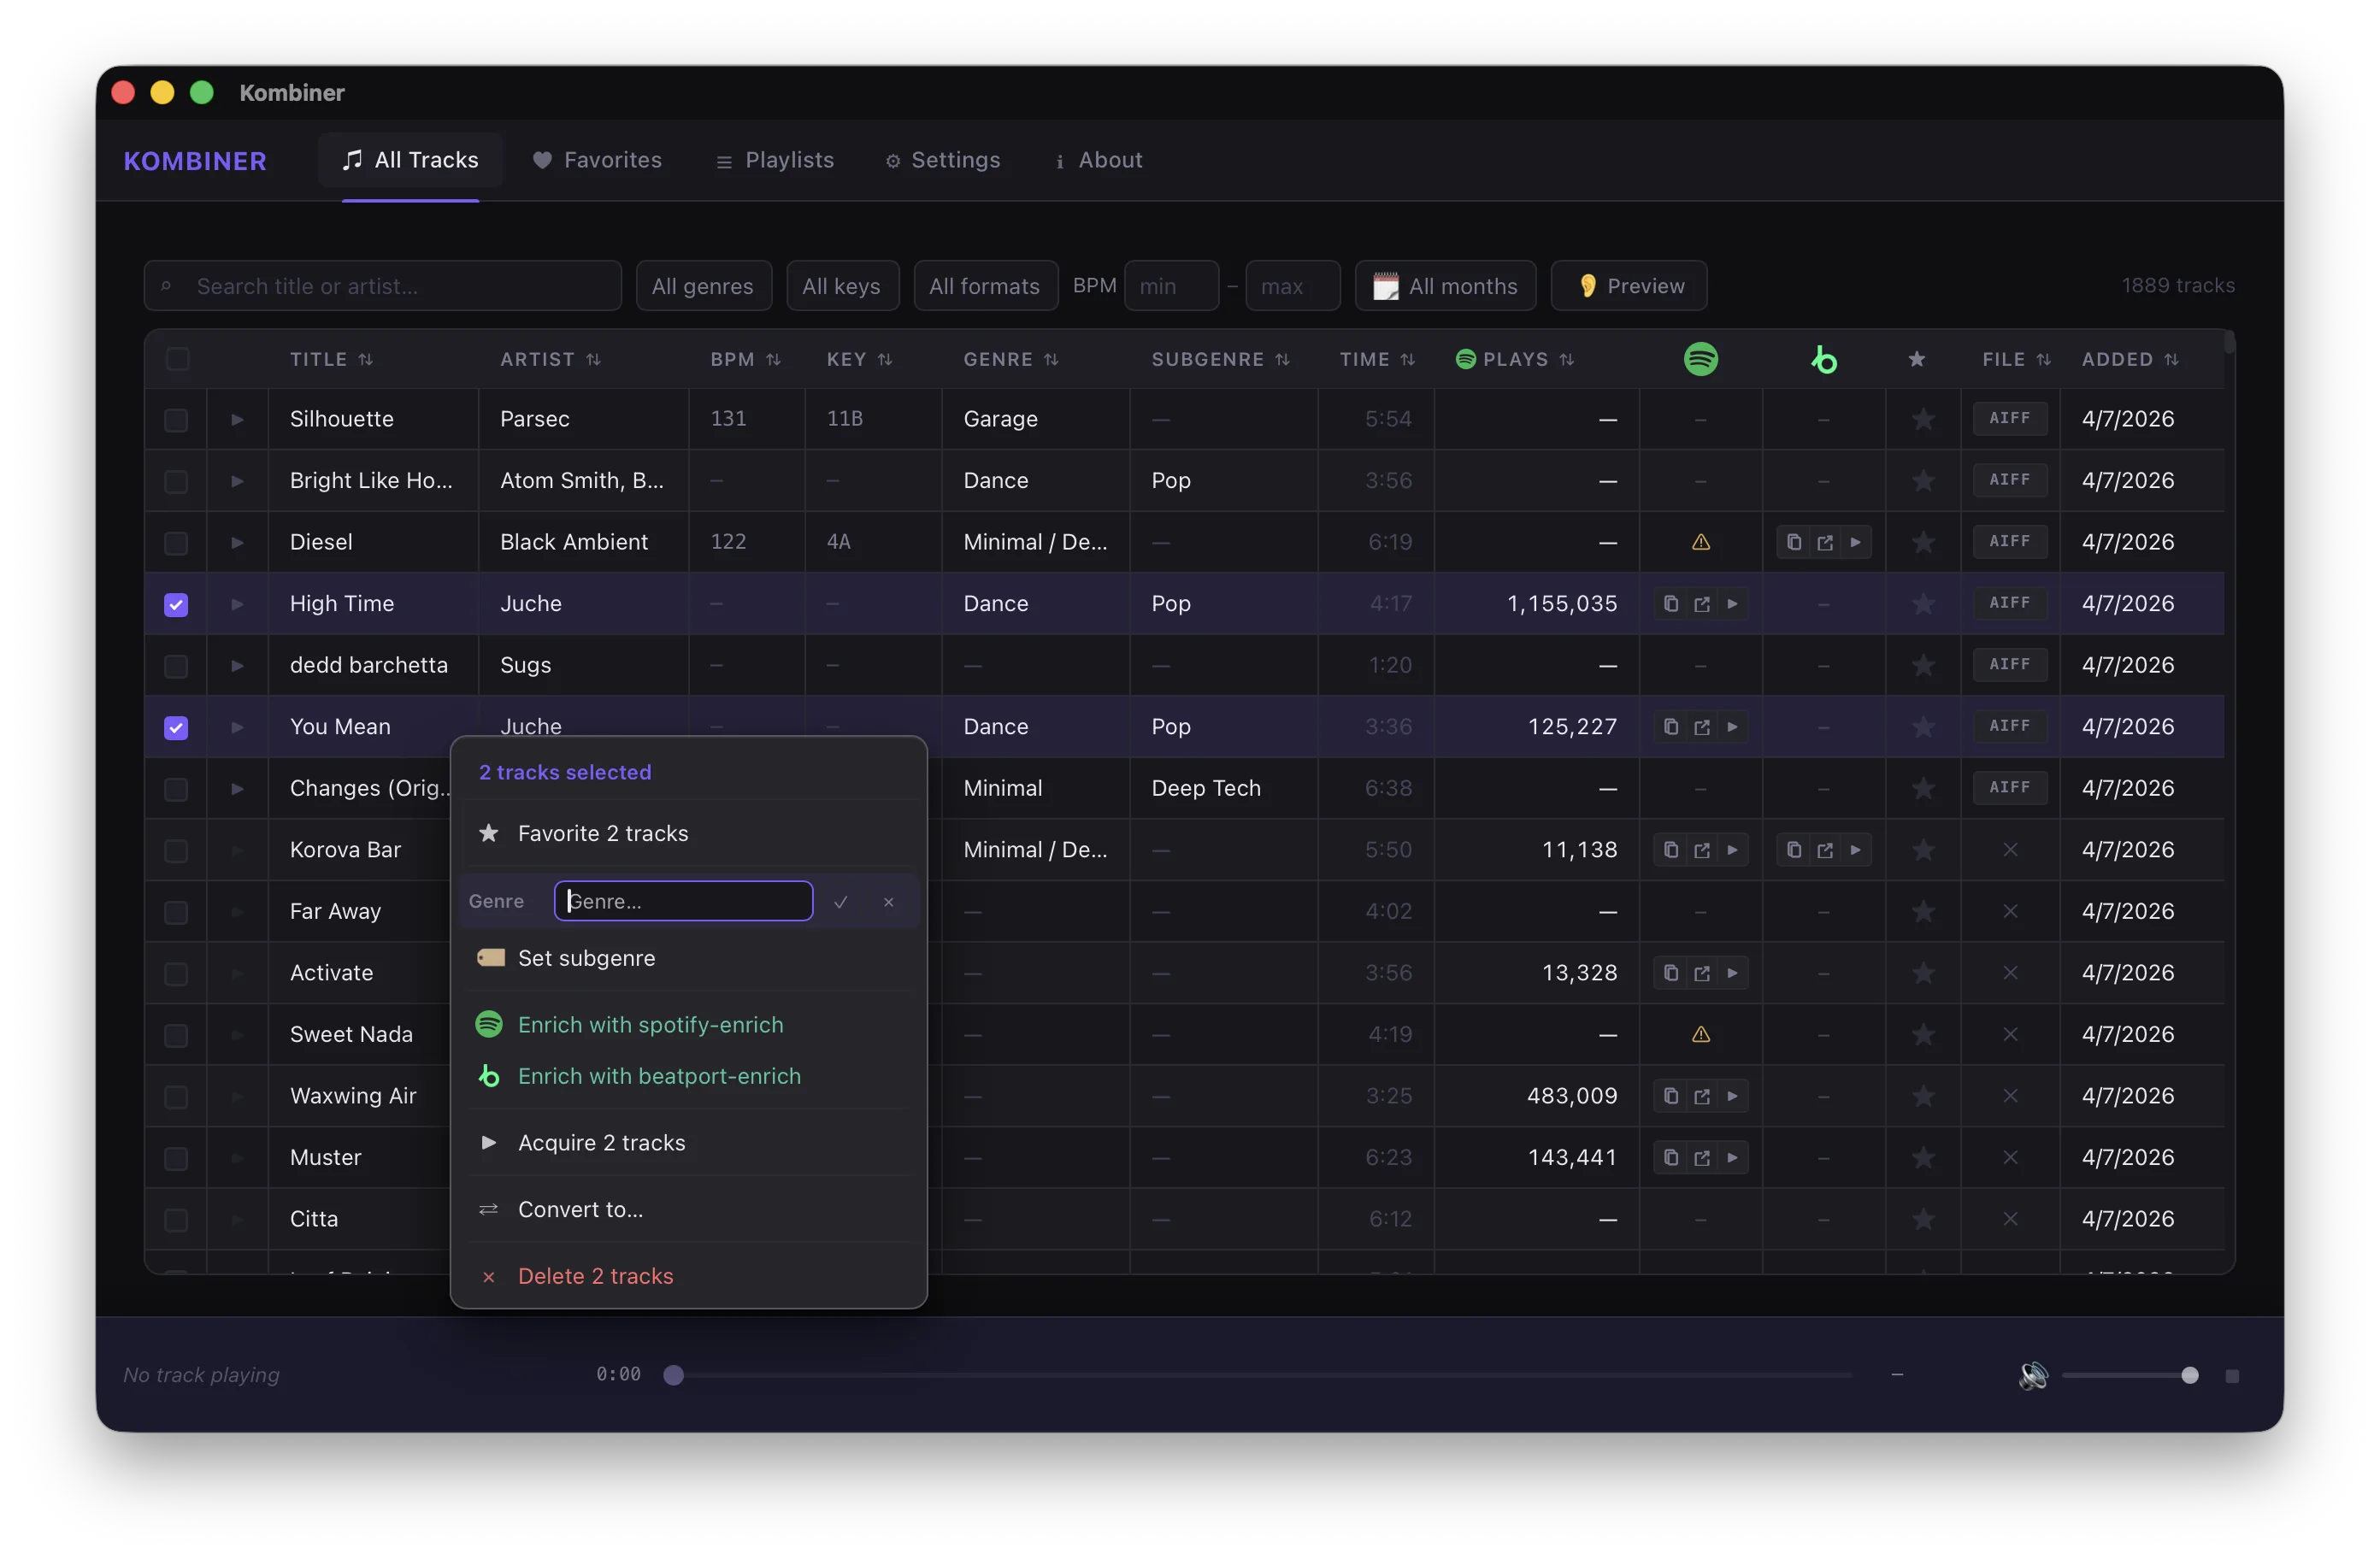

Batch actions are where the time savings become obvious. Twenty tracks that used to take two hours now take the time it takes to select them and click a button.
Step 5: Spectrogram Analysis
For any track in your library, you can open the Spectrogram view — a visual frequency analysis of the audio file.
This isn’t decoration. The spectrogram tells you things the metadata doesn’t:
- Whether the file is actually the bitrate it claims to be (a 320kbps MP3 that was upconverted from 128kbps will show a frequency ceiling — the spectrogram makes it visible)
- Where the energy is in the track — useful for understanding how it’ll sit in a mix
- Whether there are artifacts or anomalies worth knowing about before you play it loud through a proper system
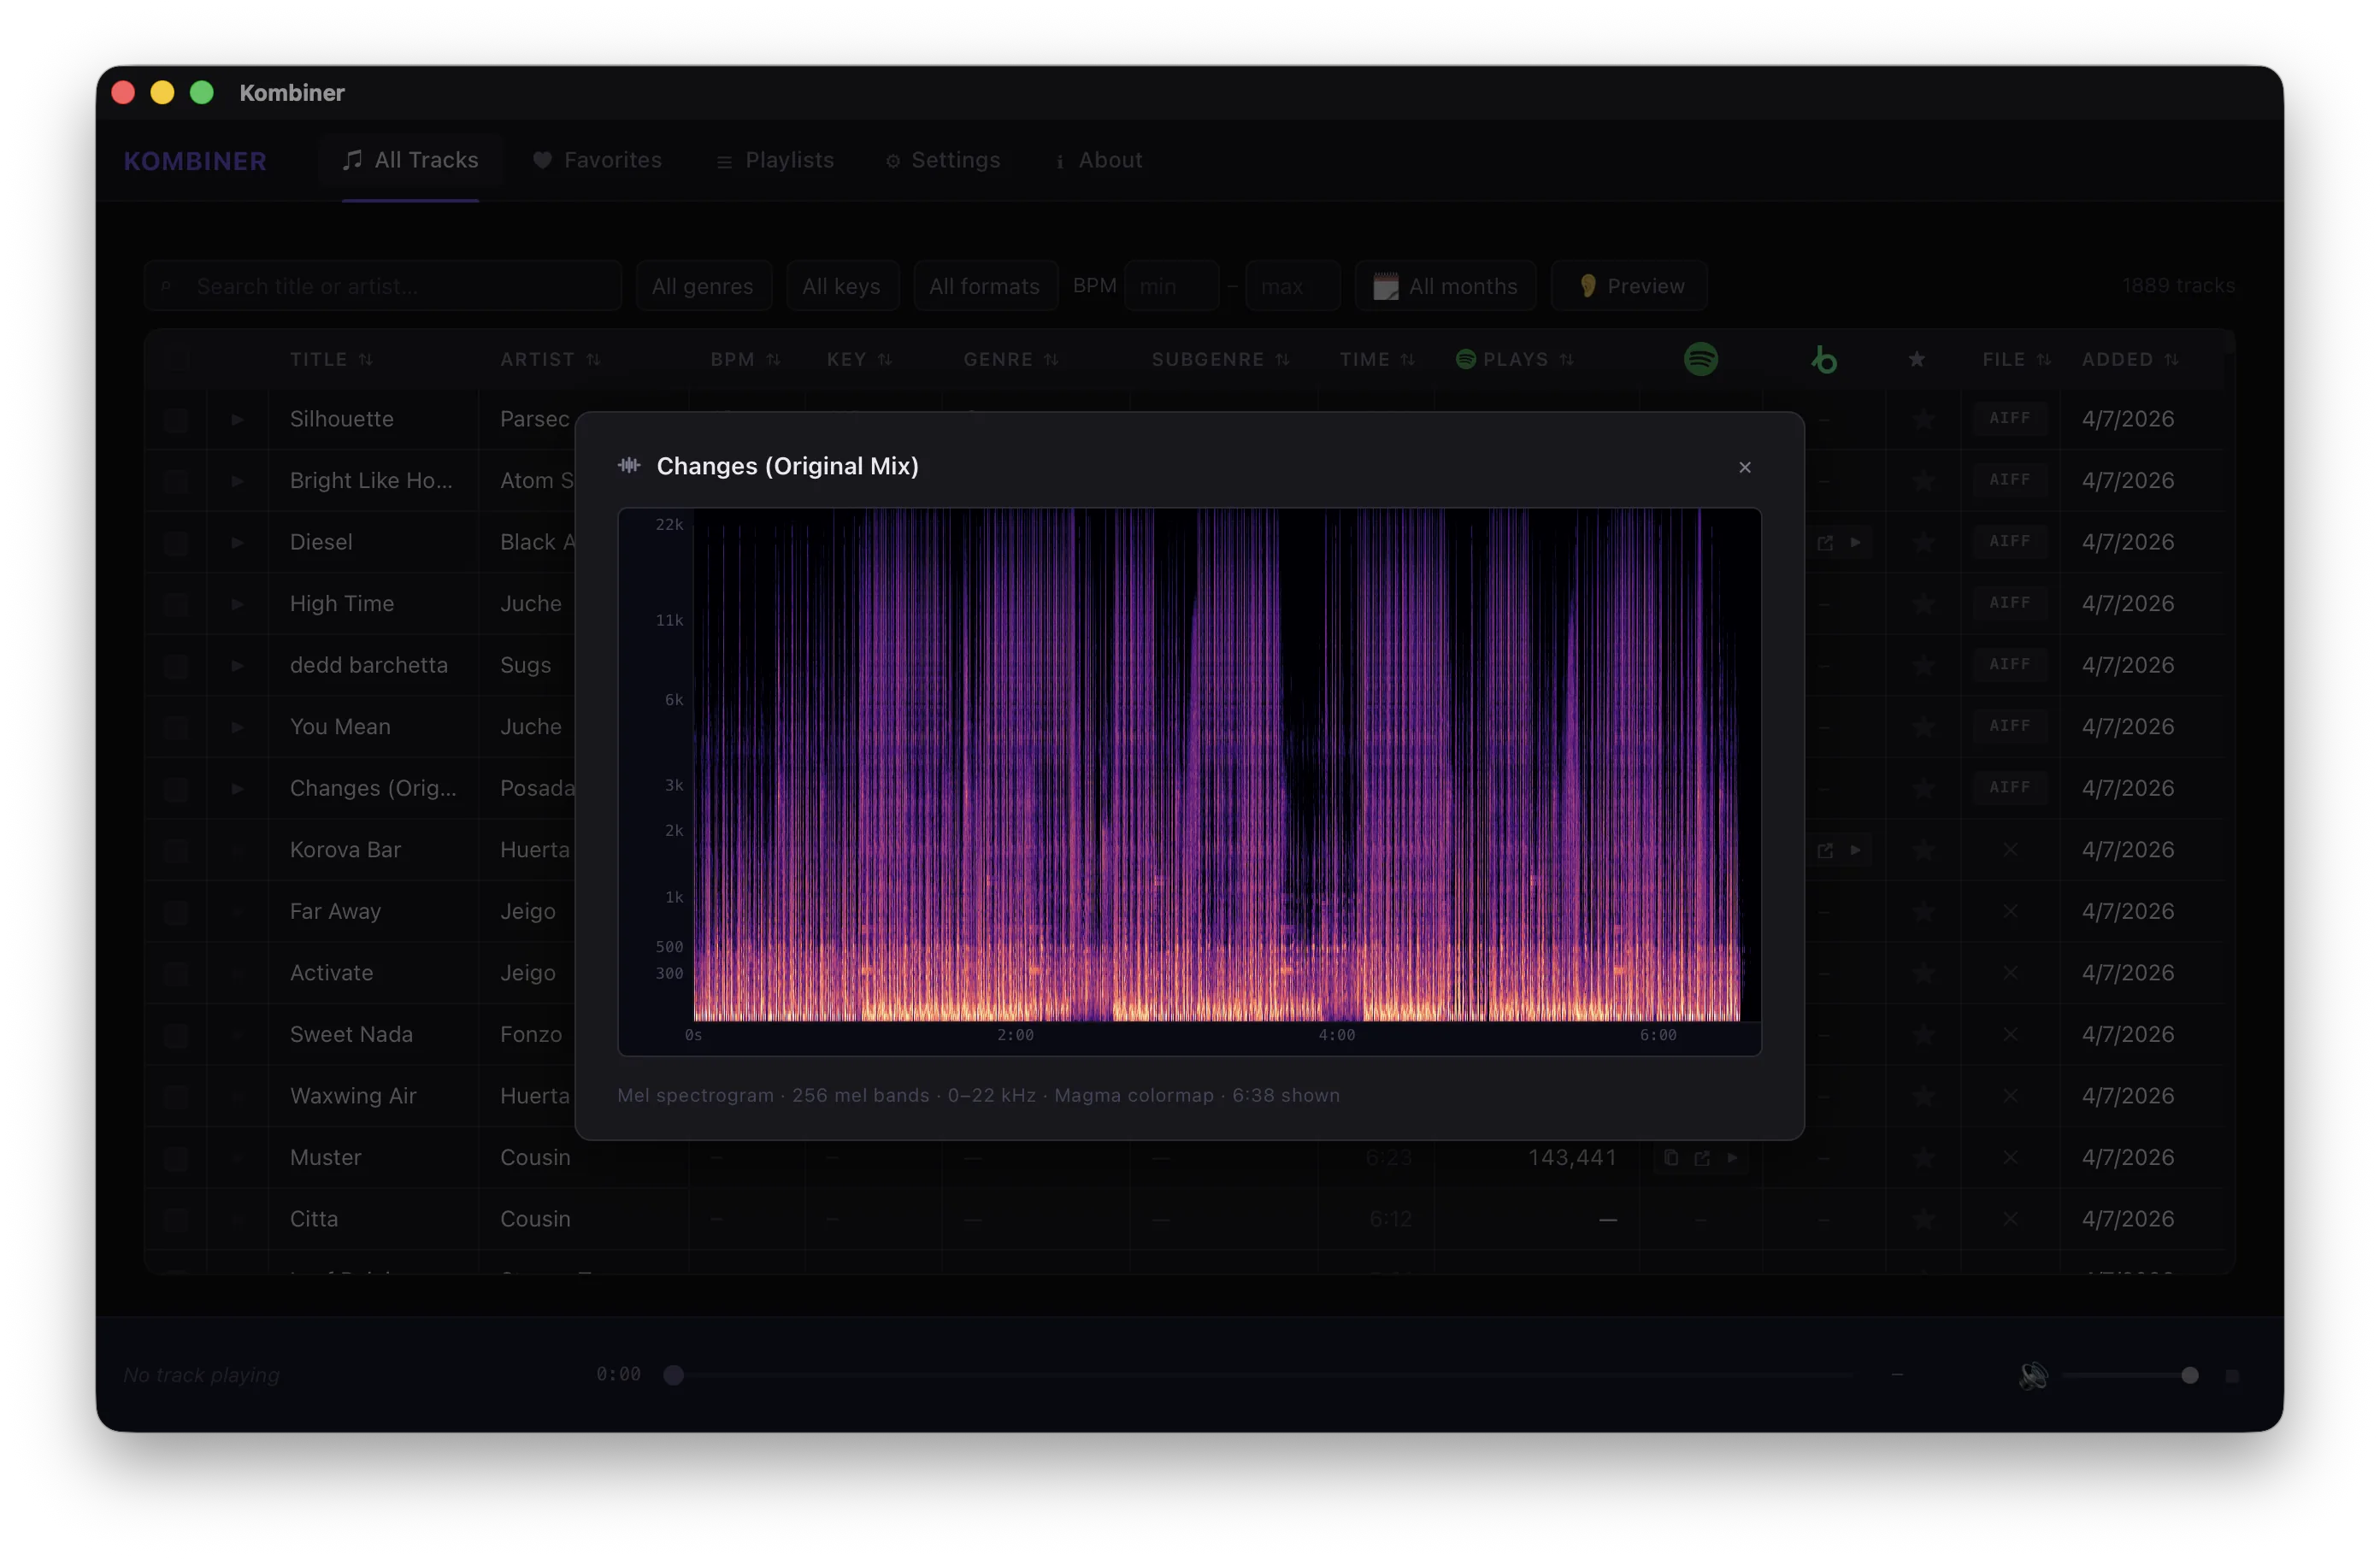
If you’ve ever had a file sound wrong in a club and had no idea why, this is the tool that would have caught it at home.
What the Pipeline Looks Like Now
With everything configured, here’s what happens when a new track enters your library:
Import → Plugins run automatically → Metadata enriched → File acquired and named → Ready to play
If there’s ambiguity (yellow dot), you resolve it once. If there’s a format mismatch, you convert it in one click. If you need to reclassify a hundred tracks, you batch it.
The pipeline does the tedious parts. You do the parts that require judgment.
That’s the whole idea.
A Few Things Worth Knowing
The file path template applies on acquire and on conversion. If you change the template after you’ve already imported tracks, existing files won’t be automatically renamed — only new ones will follow the new pattern. Renaming existing files via batch action if you want consistency across the whole library - planned feature.
Logs are your friend. If a plugin returns unexpected results, open its settings and check the log before assuming something is broken. Most surprises have a readable explanation in there.
Keychain / Credentials Manager storage is per-device. If you move to a new machine, you’ll need to re-enter plugin credentials. They don’t travel with the app.
Reset browser button. Each plugin, that uses browser, has button to reset profile - use it in case of problems with plugin. Each plugin has it’s own profile, so no data shared, even between different plugins for the same service.
What’s Next
This is beta. Things will change — new plugins, new batch actions, deeper Rekordbox/Serato/Traktor export options, and a few things we’re not ready to talk about yet.
If something in the walkthrough doesn’t match what you’re seeing, or something in the app is behaving unexpectedly, that’s what the beta is for. Let us know at dan@kujin.dev.
And if the workflow is clicking — if the yellow dots are resolving and the spectrogram is catching things and the batch actions are saving you the two hours — we’d genuinely love to hear that too.
Kombiner is in early access on macOS and Windows. If you don’t have access yet, get it →.