Building a DJ Library from Scratch
This guide walks you through the complete first-time Kombiner workflow — from a blank slate to a fully imported, enriched, and acquired DJ library. Follow these steps in order if you are setting up Kombiner for the first time.
Step 1 — Install and Configure the Music Folder
If you haven’t installed Kombiner yet, follow the Getting Started guide first.
Once the app is open:
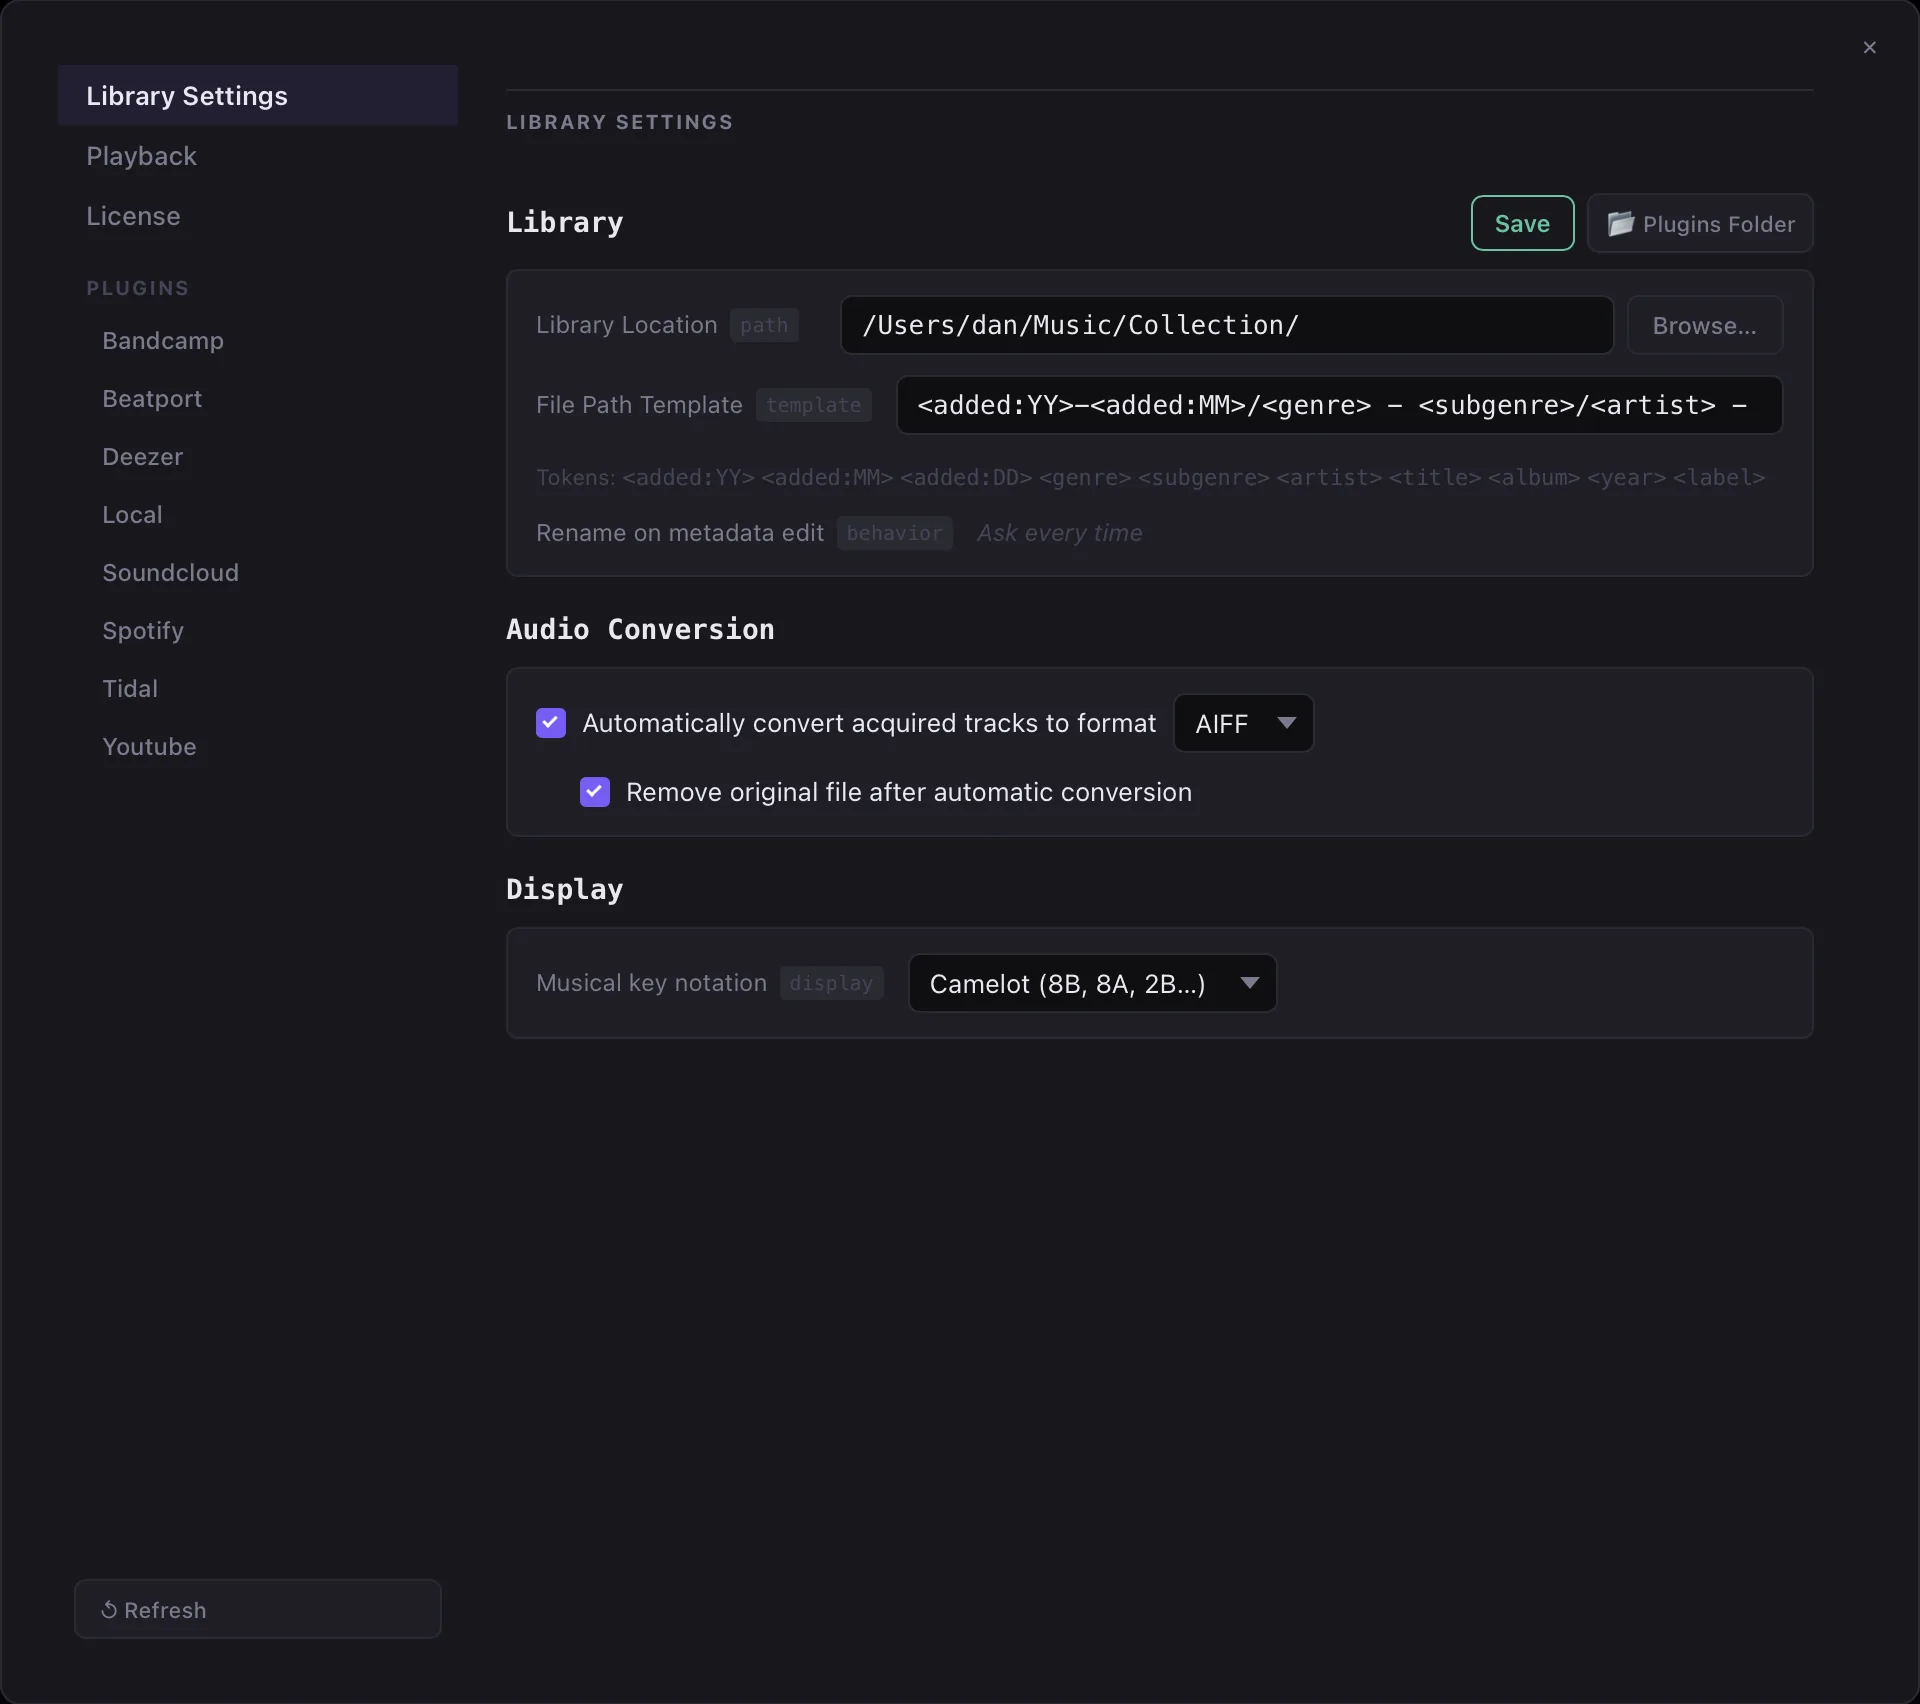
- Navigate to Settings → Library.
- Set your music folder to the directory where you want downloaded files to live. Pick a location with plenty of free space — a typical DJ library in FLAC can run to 100 GB or more.
- Set your file path template. A good starting point for most DJs is
<added:YY>-<added:MM>/<genre>/<artist> - <title>, which creates a clean folder hierarchy. If you prefer flat storage,<artist> - <title>works well too. - Optionally, configure audio conversion settings if you want downloaded files automatically converted to a specific format (e.g. always convert to MP3 320).
Tip: Put your music folder on a fast internal SSD rather than an external drive. Kombiner streams audio from disk during playback, and slow drives can cause stuttering when browsing large libraries.
Step 2 — Configure Import Plugins
Go to the Plugins section and enable the import sources you use.
Spotify Import
- Click Spotify Import → Enable.
- Enter your Spotify email and run import.
- In-app browser opens for 6-code verification.
Kombiner pulls your Liked Songs, Saved Albums, and Playlists from Spotify. All of these appear in your library after the first import run.
Tidal Import
- Click Tidal Import → Enable.
- Enter your Tidal credentials and run import.
- Kombiner imports your Favorites.
SoundCloud Import
- Click SoundCloud Import → Enable.
- Enter your SoundCloud credentials and run import.
- Kombiner imports your Likes feed.
Tip: You can enable as many import plugins as you need. Tracks that appear on multiple services are automatically deduplicated into a single library entry — you won’t see duplicates.
Step 3 — Configure Enrich Plugins
Once your library is populated, set up enrichment to fill in BPM, key, genre, and other metadata.
Beatport Enrich
Beatport is the most authoritative source for electronic music metadata. The Beatport Enrich plugin finds the matching Beatport catalog entry for each track and retrieves BPM, musical key, genre, label, and release date.
- Click Beatport Enrich → Enable.
- Enter your Beatport account credentials.
- Set Auto-Run and Update Every to your preference.
Spotify Enrich
The Spotify Enrich plugin uses Spotify to retrieve play counts. This is useful even if you didn’t import from Spotify.
- Click Spotify Enrich → Enable.
- Enter your Spotify email (if you haven’t already set for spotify import).
- Set Auto-Run and Update Every to your preference.
- On first run, in-app browser will open to authenticate with 6-digit code.
Tip: Enable both Beatport Enrich and Spotify Enrich together.
Step 5 — Run Enrichment
Select tracks you want to enrich and click Enrich in context menu.
Each enrichment plugin processes tracks in the background. You can track progress using the N / M coverage badges visible in the enrich panel — these update in real time as the run progresses.
This process may take hours depending on the number of tracks, server load, and internet speed.
Step 6 — Browse, Filter, and Organize
Now that your library is populated and enriched, spend some time getting familiar with the track table:
- Search using the search bar — searches across title, artist, genre, and label simultaneously.
- Filter by BPM range, key, genre, format, or month added using the filter toolbar.
- Sort by any column — click the column header to toggle ascending/descending.
- Inline edit any field — double-click a cell (title, genre, BPM, key) to edit it directly in the table.
- Bulk actions — select multiple rows with
CtrlorShiftand right-click to apply bulk edits, add to playlist, or delete. - Play a track by clicking the play button in the row — for tracks that are not yet downloaded, preview stream will be used.
Add tracks you love to Favorites by clicking the star icon. Create playlists in the sidebar for genres, moods, or upcoming sets.
Tip: Use the key filter alongside BPM range to find harmonically compatible tracks. Camelot Wheel notation (e.g.
8A,9B) is supported if your enrichment plugins return it.
Step 7 — Acquire Your Tracks
Tracks imported from streaming services are metadata-only — they don’t include a local audio file. Use the Acquire stage to buy or download them.
- Identify tracks to buy — Use the No File filter to see all tracks without a local file.
- Filter by genre — Use the genre filter to narrow down your selection.
- Sort by Plays — Click the Plays column header to sort tracks by their play count.
- Add to cart — Select the tracks you want, right-click, and choose Acquire. Or add tracks to playlist to acquire later. Or add to Favorites — you decide.
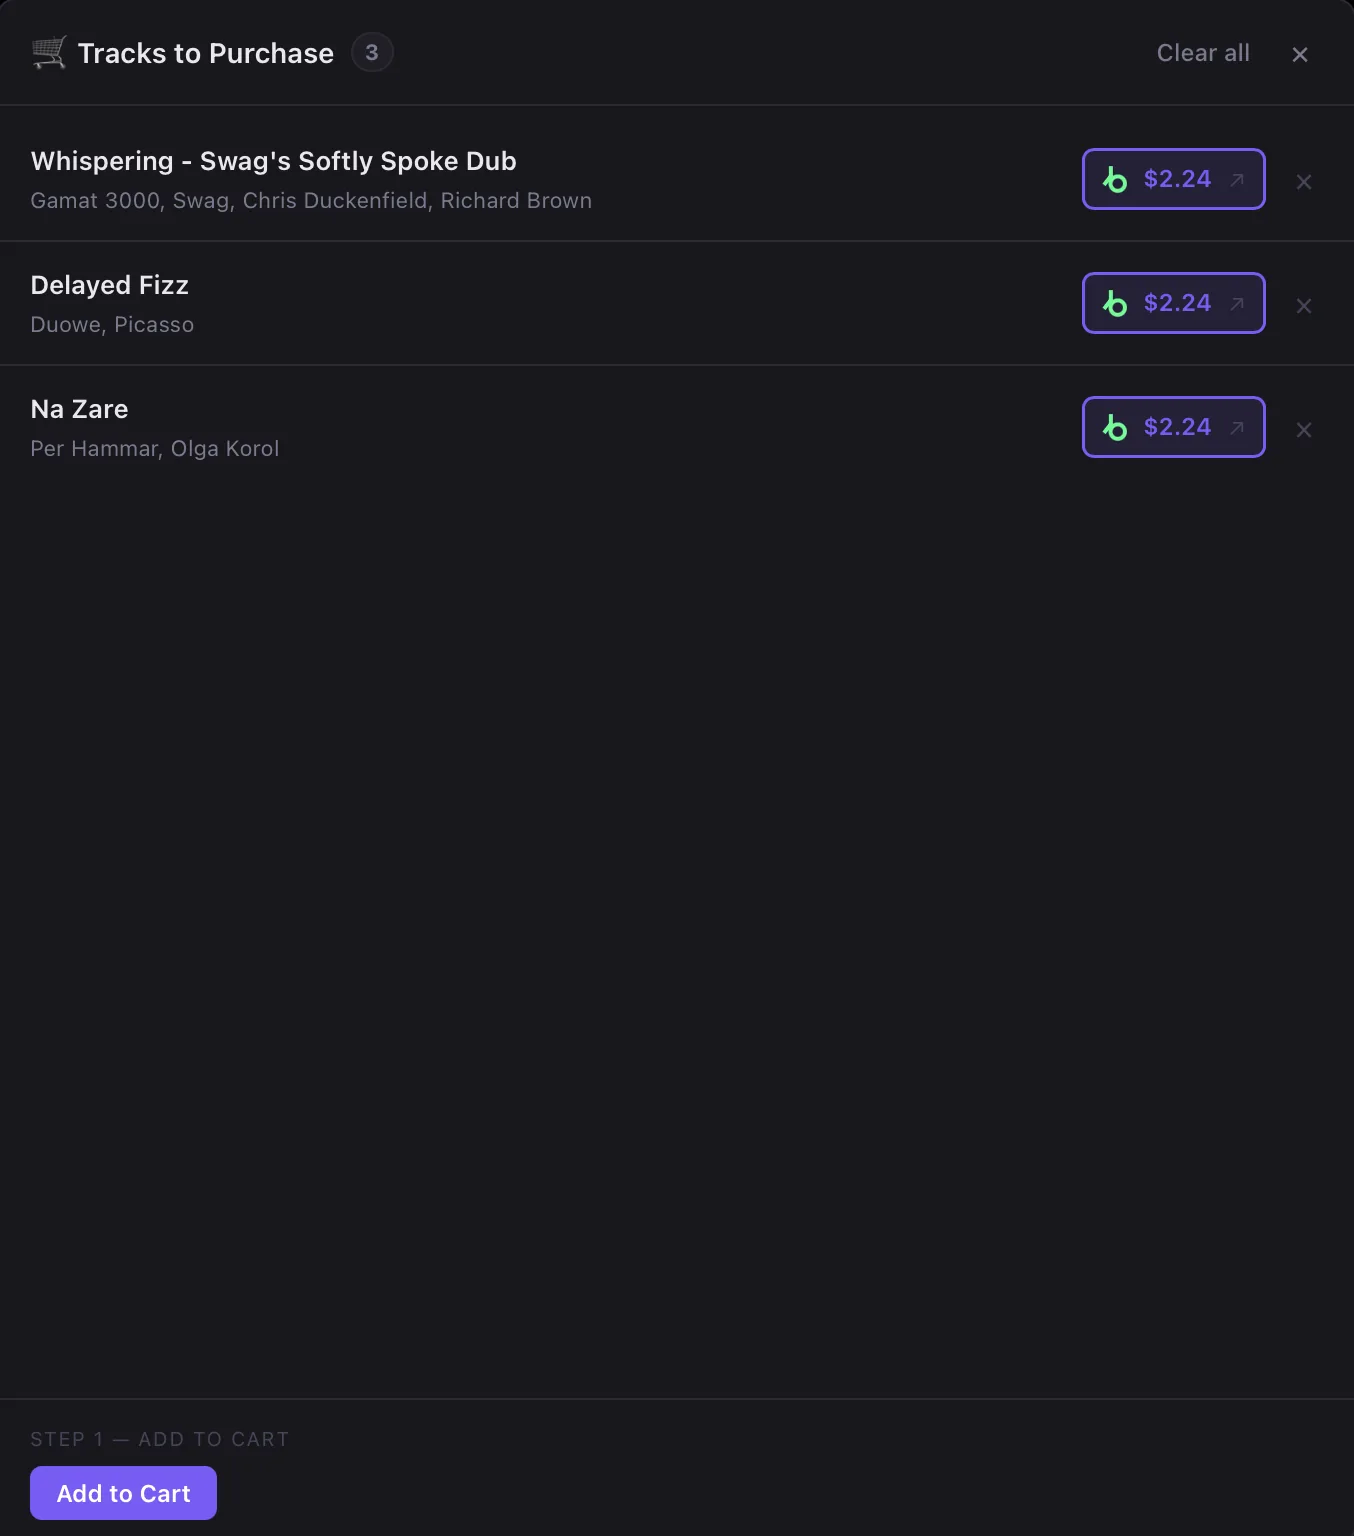
- Open the Cart — Click the cart icon in the toolbar.
- Choose Beatport or Bandcamp depending on the price and where you want to buy for each track.
- Acquire — Click Add to Cart to fill carts on services.
- Either open cart in browser or click Buy and checkout in-app.
- Kombiner downloads the files, saves them using your file path template, and updates each track’s
file_path.
After acquisition, tracks are immediately playable in Kombiner’s audio player — hover over a track to preview it, or click to play it in full.
Congratulations — your DJ library is set up. From here, Kombiner will keep it automatically in sync as you save new tracks to your streaming accounts.